
A few weeks ago, while I was at my office in Barcelona performing an implant surgery with a connective tissue graft, I was thinking about how much I used to enjoy this kind of surgery and how they stopped being so enjoyable the minute they became routine. I remember that day I chose “The80’s playlist” from my iPod. “
It was what I used to listen to bring some action during my not-so-large days of work . Yes, it’s fantastic to hear from some of my pals how proud they are when they perform a full-arch immediate loading or a bilateral sinus lift surgery at 9 pm.
I congratulate them on that, but it doesn’t suit my lifestyle anymore, although I might be poorer for refusing to perform block grafts after midnight).
While” Right Between the Eyes” was playing in the background (I know, sometimes I feel a little bit nostalgic about the eighties), something not so usual happened: I was finishing harvesting a massive slice of connective tissue, and the palatal artery just decided to be where it shouldn’t be (or maybe that was my first complaint –”anatomical aberration,” I said).
That was what I consider a shot “Right between the eyes.” First, I solved that bloody mess constraining the palatal artery with a ligature suture and then pressuring with gauze for 15 minutes. Fortunately, it stopped bleeding, and my patient didn’t even realize something wrong had happened.
I finished the surgery without any other inconvenience (almost any inconvenience: my patient couldn’t pay the bill. Not even some of it. It was almost summer, and he wanted more money to spend on his vacations. I don’t blame the chap; I would do the same).
After finishing the surgery, I thought that if I created a few topics with some rules and concepts on a small piece of paper, I would help other colleagues avoid this kind of complication and maybe help them enjoy plastic periodontal and implant surgery.
So I decided to create this article in collaboration with Delia (yes, she’s another great Facebook friend; I love how she works and her tenacity. She’s very friendly and one of the most excellent people I have ever met on a social network).
So “Let’s get serious”:
We all know that performing soft tissue autografts have been a progressively trendy surgery for the past 20 years, even though the first articles about autografts in clinical periodontology were published more than 40 years ago (Haggerty 1966; Nabers 1966; Sullivan & Atkins 1968; Edel 1974).
“We assume that the increasing”democratization” on the use of soft tissue autografts is correlated with the”democratization” of implant therapy as well.”
But why do we use soft tissue grafts?
Two main goals are pursued:
1) Increase the width of keratinized tissue
2) Increase soft tissue volume
After several authors realized that the width of keratinized tissue around teeth was clinically overrated, the use of free gingival grafts (FGG) started to be an option to solve aesthetic defects like soft tissue recessions (Bernimoulin et al. 1975; Miller 1982), soft tissue ridge augmentation (Seibert 1983) and for something that is quite trending nowadays: Socket preservation in the aesthetic zone (Landsberg & Bichacho 1994).
We all know that FGG has two significant limitations: volume augmentation and aesthetic result (sometimes the color and surface don’t blend in with the receptor site), and soon the advantages of using subepithelial connective tissue graft (SCTG) started to be evident in the literature (B. Langer & Calagna 1980; B. Langer & L. Langer 1985).
Considering the advantages of the SCTG over the FGG, we will focus this article on SCTG.
We also should know the role of inherent factors regarding the genetic determination of gingival tissues, and for that, I recommend you the articles from Karring ((Karring et al. 1971; Karring et al. 1975) and also this lecture from Juan Alberto Fernandez on Oralsurgerytube which I strongly recommend you to subscribe.
Anatomical considerations
The masticatory mucosa of the hard palate is composed of three histologic layers:
– The epithelium (300 µm thick, 0,3 mm. This is a pretty thin layer)
– Lamina Propia
– Submucosa
– Periosteum

Layers that can be observed at the masticatory mucosa
Fig. 1- Layers that can be observed at the masticatory mucosa.
The thickness of the masticatory mucosa varies substantially from patient to patient. Also, depending on the donor site, it can be thicker in the tuberosity (4 mm) than in the palate (3 mm) (Muller et al. 2000).
Another important finding by Gapsky is that the subepithelial connective tissue from the tuberosity is very dense, coarse, and collagen-rich tissue with less fat and glandular tissue, which all these may have some clinical interest (Gapski et al. 2006).
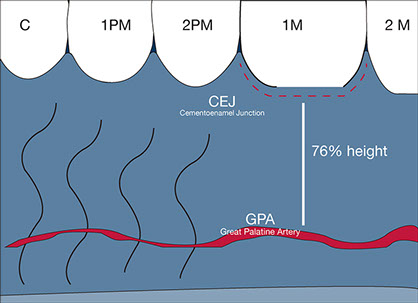
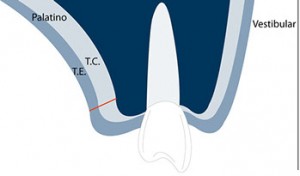
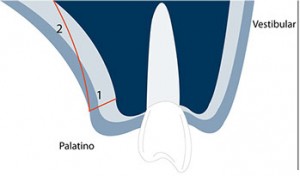
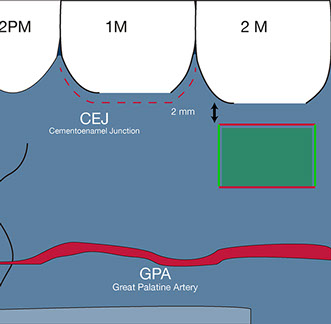
Another anatomical consideration that should always be respected is the great palatine artery (GPA). To keep it simple, I will use the reference from Monnet-Corti, where the main branches of the GPA were +/- 12 mm distance from the gingival margin at the canine region +/- 14 mm at the second molar region (Monnet-Corti et al. 2006).
Although this study has some inaccurate measurements (the gingival margin is not always a good reference), almost all the authors assumed that the GPA could be found at a distance of 76% of the global palatal height measured from the cementoenamel junction of the first molar.

The donor site for a connective tissue graft
We should consider two areas of interest:
– Anterior palate: Extensive surface
– Posterior palate (tuberosity and lateral palate): Tuberosity is very voluminous, which is a good option for alveolar ridge augmentation, and lateral palate is well indicated for recession coverage.
They are both too dense and firmer than the anterior palatal. Hence, a graft from tuberosity and posterior-lateral palate is unlikely to undergo postoperative shrinkage. Still, on the other hand, they are more prone to undergo necrosis than the anterior palate. Therefore, I strongly advise you to cover these grafts completely.
An excellent option for deciding the donor site is using an endodontic needle with a silicon disc. With this assessment, it can also be felt the transition between the lamina propia and the adipose submucosa (Zucchelli et al. 2010).
Harvesting techniques
The harvesting techniques seek to achieve more tissue volume possible, minimize postoperative pain and reduce the risk of complications. Let’s look at some of those techniques.
1. SCTG harvesting from the anterior palate
I will only explain the single incision technique, which in my opinion, has the best postoperative behavior for the patient. In contrast, primary closure is achieved when this technique is used.
First, a horizontal incision along the row of the teeth from the mesial border of the first molar and the lateral incisor, 2 mm apical to the gingival margin and 1.5 mm deep. The remaining incisions are performed under the mucosal surface.
The flap should not be extended more than 10 mm apical from the cementoenamel junction of the posterior maxillary teeth, so if we count with the 2 mm distance from the first horizontal incision, we should know that no more than 8 mm deeper the extent of the graft. Therefore we can reference a No. 15 scalpel blade with a cutting portion of approximately 8 mm(Zuhr et al. 2014).
After we decided on the graft size, two vertical and horizontal incisions should be created inside the envelope. This connective tissue harvested can be obtained with or without periosteum, but we should assume that those gathered with periosteum will have better mechanical behavior but more negative postoperative consequences.
For the following wound closure, horizontal compression sutures are a good option (see video).
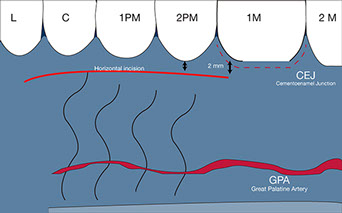
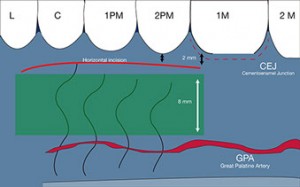
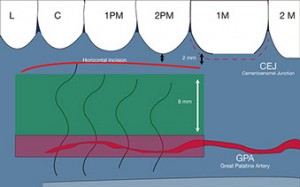
Fig. 4, 5, 6 – The first horizontal incision 2 mm below the gingival margin and the 8 mm (the size of the No 15 blade) immediately below those 2 MMS is the security or comfort zone where the SCTG can be harvested.
<

This sequence explains the step by step of an SCTG harvesting from the palate.
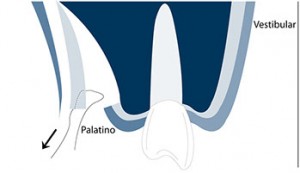
2. SCTG harvesting from the posterior lateral palate
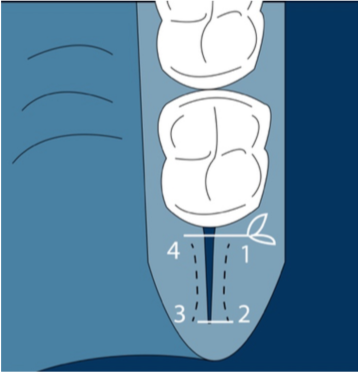
In this case, it is better to use the trap-door technique with one horizontal incision on the first or second molar and two vertical incisions that should be extended 1 mm further than the intended apicocoronal dimension of the graft.
These two vertical incisions will allow us better access to the apical incision line. As the previously described technique, a split-thickness flap is prepared parallel to the external mucosal surface.
After removing the connective graft, single interrupted sutures can be used to achieve primary closure of the wound.

3. SCTG harvesting from the lateral palate with a free gingival graft that is de-epithelialized extra-orally
In this case, two vertical and two horizontal incisions are performed at 1.5 mm deep. The resultant rectangle should be the size of the desired graft. Then the blade is rotated parallel to the mucosal surface. The soft tissue is detached with both epithelialized and connective tissue fraction that is further split with a new blade.
For this technique, magnification is essential to perform the de-epithelialization extra-orally, and the donor site is left for healing by second intention (significant disadvantage).
4. SCTG harvesting from the maxillary tuberosity
This is, so far, the most straightforward technique to obtain an excellent connective tissue graft. Of course, if the last present teeth are the first molar, more extensions will have the graft, but this also can be performed with the presence of the second and the third molar.
“Two perpendicular converging incisions with a”V” shape extended as distal as possible but always inside the masticatory mucosa. The incision should include the tissue around the distal tooth surface. Sometimes I perform this surgery after removing the third molar if a connective tissue graft is needed for another surgery.
“Two perpendicular converging incisions with a “V” shape extended as distal as possible but always inside the masticatory mucosa. The incision should include the tissue around the distal tooth surface. Sometimes I perform this surgery after removing the third molar if a connective tissue graft is needed for another surgery.

“Fig. 9- Converging incision with a”V” shape at the tuberosity is a reliable and easy approach to get a nice amount of connective tissue to graft. For those beginning with soft tissue augmentations, this may be the chosen approach for the first cases.”Fig. 9- Converging the incision with a “V” shape at the tuberosity is a reliable and straightforward approach to getting a nice amount of connective tissue to graft. For those beginning with soft tissue augmentations, this may be the chosen approach for the first cases.
It also is an option to get a connective tissue graft to perform immediate implants.
Conclusion
So far, an autologous connective tissue graft is considered the gold standard. However, this represents a second surgical wound to our patients and all the complications that may represent (necrosis, pain, swelling, infection).
A lot of efforts by scientists and manufacturers aim to create a biomaterial that could avoid harvesting autologous grafts from our patients (although it is something that I perform very often, I’m eager to have in a small bottle a gold standard without creating an extra surgical wound on my patients).
On the other hand, if finally, innovation brings us a biomaterial with similar behavior to the autologous graft, there will be no limitation for grafting, something that today can happen, and sometimes during surgery, we need some more graft, and we have to decide if we perform another surgical wound to our patient to get another tremendous connective tissue graft or handle the surgery with the graft from the first attempt.
Lately, other techniques like the socket shield technique may avoid the use of a connective tissue graft when an immediate implant is performed in the aesthetic zone because, in this case, where the buccal bone is preserved due to the presence of a fragment of the hopeless teeth, there is no need to enhance the buccal volume. You can learn more about this technique here.
Harvesting autologous connective tissue graft is a standard procedure nowadays, and this short article aims to help dentists to perform their first soft tissue graft. However, I strongly recommend reading the associated literature to comprehend this procedure.
Reccomended Book if you want to take your soft tissue and hard tissue management to the next level


