How to Solve the Most Common Bone Defects With Guided Bone Regeneration

Table of Contents
Trying to perform implant dentistry without understanding bone dynamics, guided bone regeneration basic techniques, and biology is like organizing a barbecue for vegans.
We have to understand and guided bone regeneration works before starting any surgery involving implants. If things go wrong, we have to be able to solve it without the patient noticing that there is a complication.
Today I´ll cover the most common effects you can find in your daily practice when performing implants.
Let's start exploring Hammerle and Benic classification from 2014:
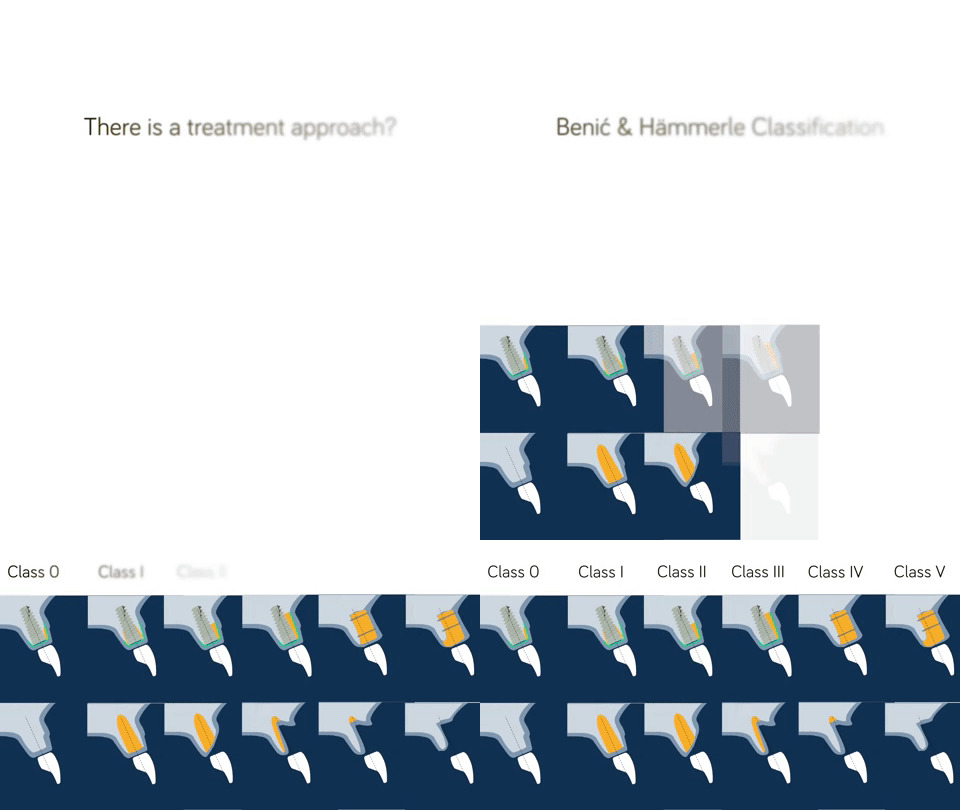
#1. What are the criteria for making a decision regarding the optimal bone augmentation protocol and the selection of materials?
This decision is made based on the defect morphology and if the ridge contour needs to be augmented.
To help you to decide on whether to place the implant and regenerate the defect simultaneously or whether to perform a staged approach, some classifications have been proposed (Hämmerle 2014).
The best choice is always to make a combined approach: less treatment time and less patient morbidity.
In some cases, the implant cannot be placed in an ideal position, or the remaining bone does not allow the placement with optimal primary stability.
In that case, a staged approach should be the chosen option.
Let's start with the most common defects:
1) CONTOUR DEFICIT TYPE 0
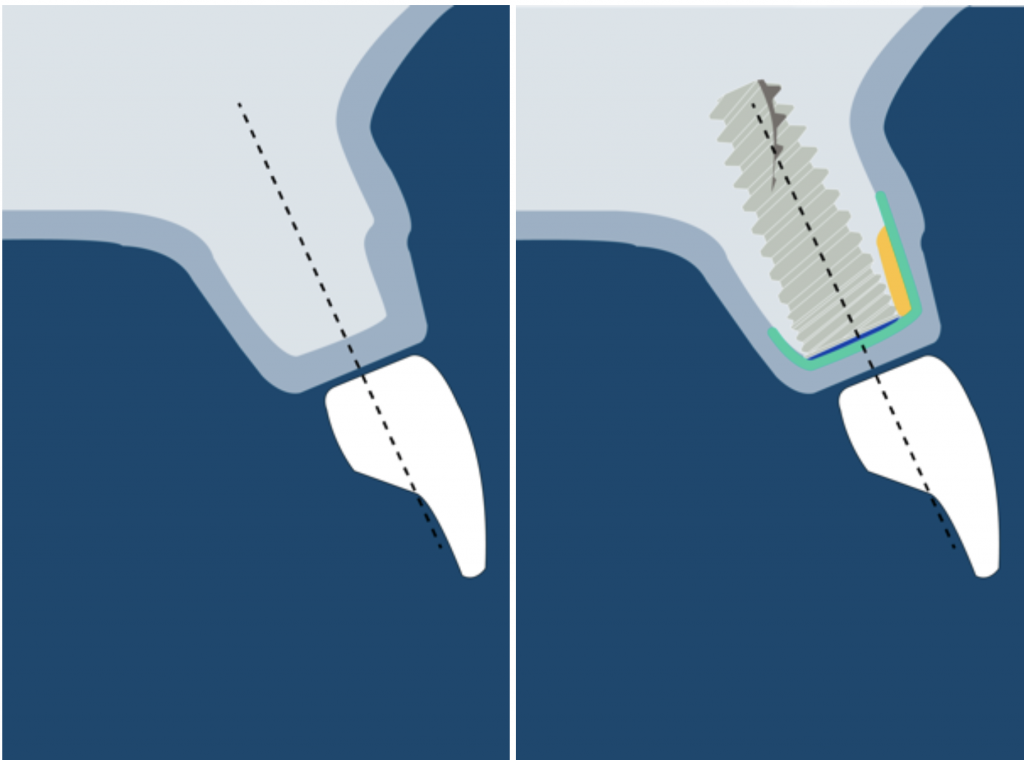
In these cases, the implant will be surrounded by bone, but augmentation is recommended to enhance the buccal volume.
This also should be performed when a thin bone wall is present after placing the implant.
If the buccal bone wall thickness is inferior to 1,8 mm, it will be resorbed (Spray 2000).
Watch this video to understand the article from Spray in 2000 better.

2) INTRA- ALVEOLAR DEFECT: CLASS I
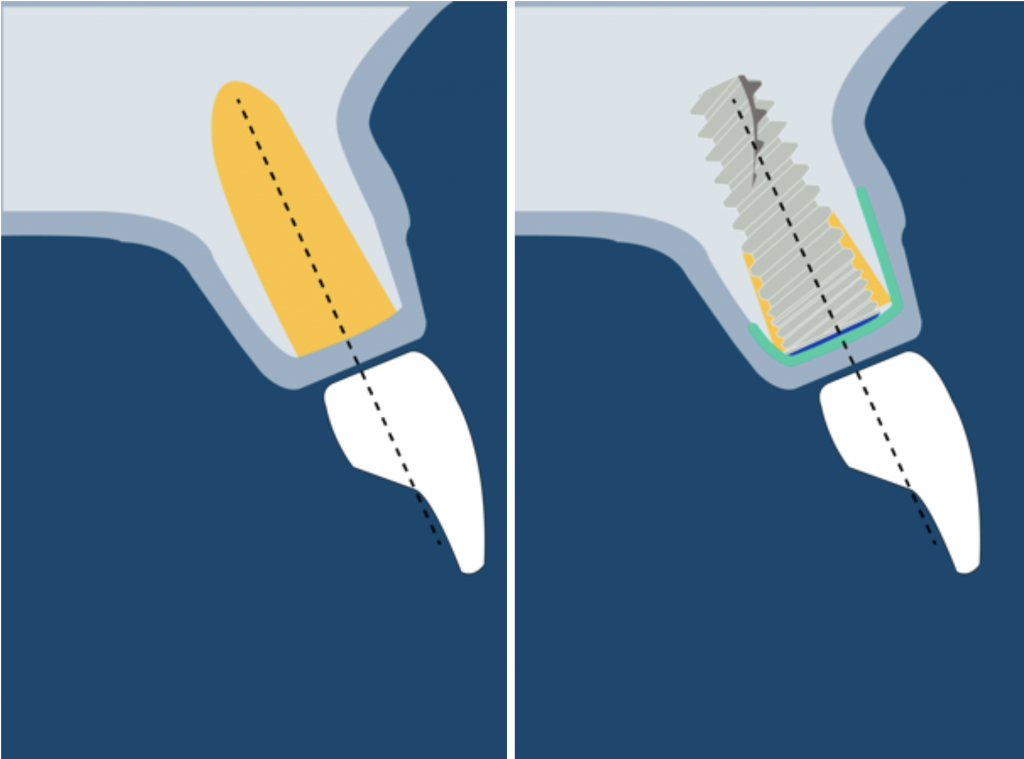
This typically happens when an immediate implant is placed.
A gap will remain between the socket and the implant. Some authors claimed that if this gap is inferior to 1,5 mm, it does not necessarily need to be filled (Pauloantonio 2001).
However, Araujo and Lindhe stated that this gap should always be filled to maintain the peri-implant contour (Araujo 2011).
You can read more about immediate implants in this ebook entirely dedicated to this topic.
Also, this blog post will provide you with extra insights about immediate implants.

3) DEHISCENCE- TYPE DEFECT: CLASS 2
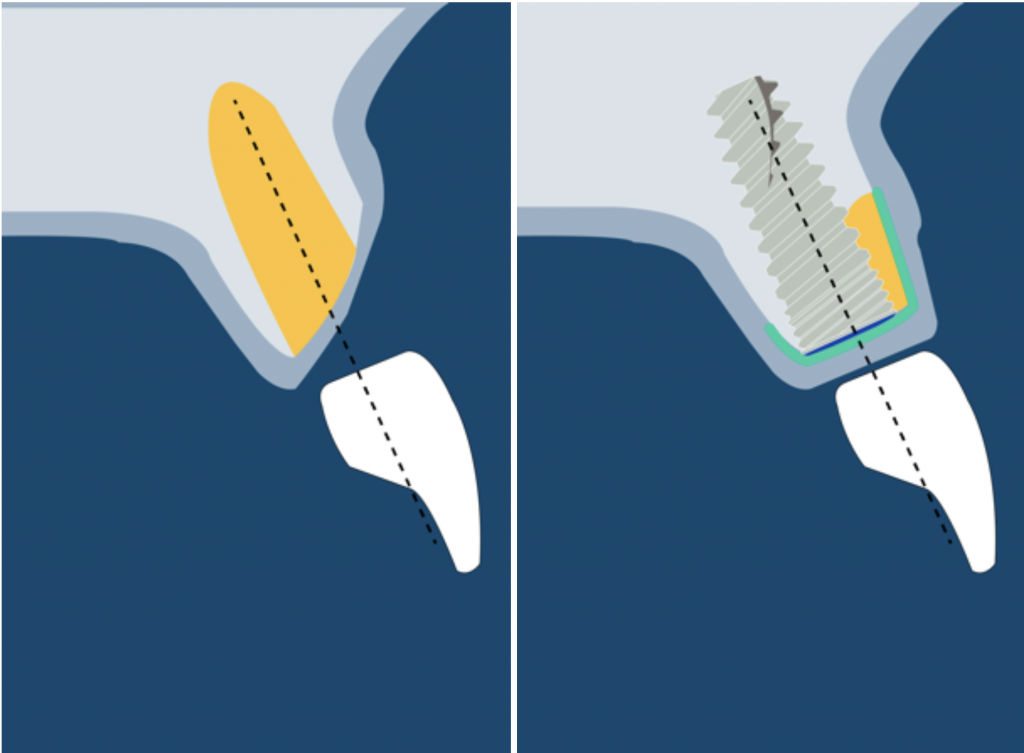
It is characterized by dehiscence in which the adjacent bone walls provide the volume of the area to be augmented.
Dehiscence of the buccal wall during the implant placement is the most frequent complication.
So, guided bone regeneration of this kind of defect is well documented in the scientific literature (Palmer 1998).
We can say that the regeneration in this kind of defect is very predictable (Kohal 1999).
In posterior and in aesthetically sensitive sites, regeneration with particulate bone substitutes and a resorbable membrane is the treatment of choice. This will provide volume augmentation in the buccal wall.
Some consideration in GBR
Some perforations can be performed in the cortical bone to improve bone repair and vascularization of the graft (Rompen 1999).
Particulate bone is applied on the exposed implant surface, and a membrane is shaped and adapted to extend 2 mm beyond the defect margins.

Sandwich Technique
Also, autogenous bone can be applied as a first layer over the implant surface. This will provide two missing properties in the xenograft: Osteogenic and osteoinductive.
After applying the autogenous bone layer, another layer of the particulate bone substitute is placed, and finally, a resorbable membrane covers the bone substitute.
This technique is named the "Sandwich Bone Augmentation Technique" (Hom-Ley Wang 2004). To perform this technique, a membrane is mandatory (Jia-Hui Fu 2013).

During healing, there are compressive forces that will collapse the regenerated site. We should always perform an over-augmentation because shrinkage of the overall volume must be anticipated.
Additional fixation should be provided to stabilize the grafted area. This can be done with fixation pins, suturing the membrane, double-layer technique, or the healing cap.

Also, a new technique involving sutures to fixate the membrane was proposed (Urban 2015).
Transmucosal healing of a guided bone regeneration has been reported as a successful procedure (Lang 1994, Hämmerle1995, Bragger 1996, Hämmerle 2001).
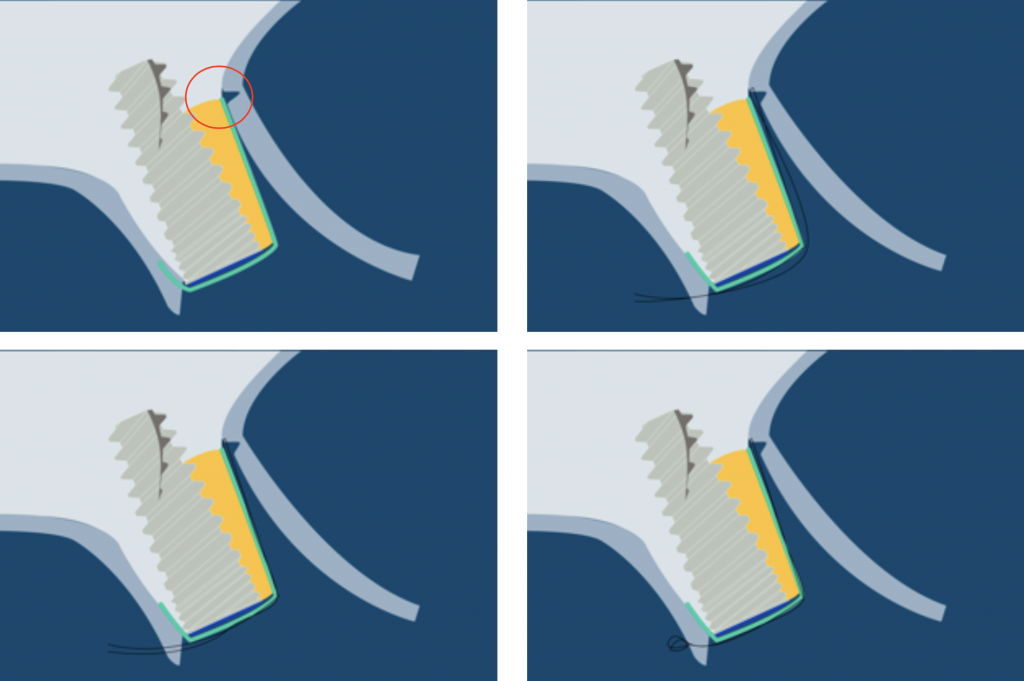
The suture is fixated below the release incision at the periosteum, and the final knot is performed in the palatal flap.
You can get the animation of this technique 👉 Here
Primary stability: Important consideration when performing GBR
But to perform this kind of approach, optimal primary stability of the implant is mandatory. A desirable torque above 35 N·cm or an ISQ superior to 60 are some parameters we should look at to perform this protocol.
Remember that the implant should not have a micromotion superior to a threshold of 50-150 μm during the healing phase (Szmukler-Moncler 1998).
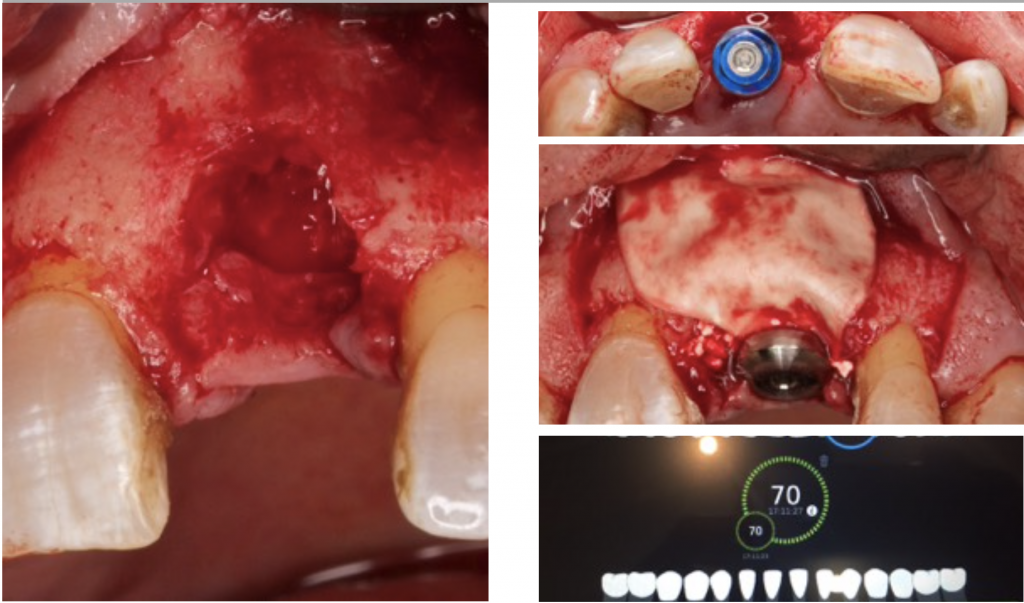
Osstell® IDX is a device that provides a value between 0 and 100.
This approach can be performed when the implant has more than 60 ISQ.
Above these values, a fibrointegration of the implant and a total regeneration failure should be expected.
There are situations where submerged healing is desired. Mainly in 3 situations:
- Non-optimal primary stability.
- Using a removable prosthesis during the healing phase can transmit undesirable forces to the implant.
- Soft tissue corrections are planned before the prosthetic phase.
4) DEHISCENCE- TYPE DEFECT: CLASS 3
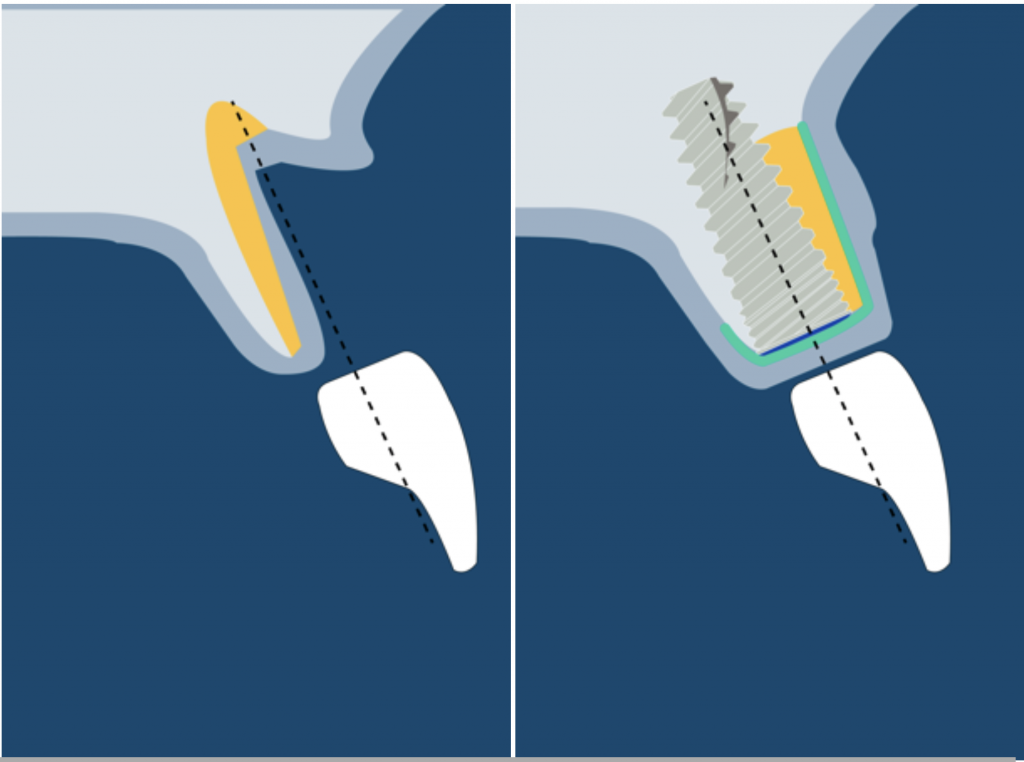
These defects are characterized by peri-implant dehiscences, in which the adjacent bone walls do not provide the volume stability of the area to be augmented.
In these defects, we will need support for the surrounding soft tissue to achieve stability of the grafted site. Reinforced e-PTFE membranes are mandatory.
Regeneration of class 3 defects step by step:
- Perforation of the cortical bone around the implant (Rompen 1999).
- Application of particulate bone substitute. Autogenous bone mixed with xenograft (50/50) has been reported as a reliable option to add potential osteogenic properties to the graft (Urban 2011).
- Resorbable membranes can be applied over the e-PTFE membrane to facilitate spontaneous wound healing during soft-tissue dehiscence.
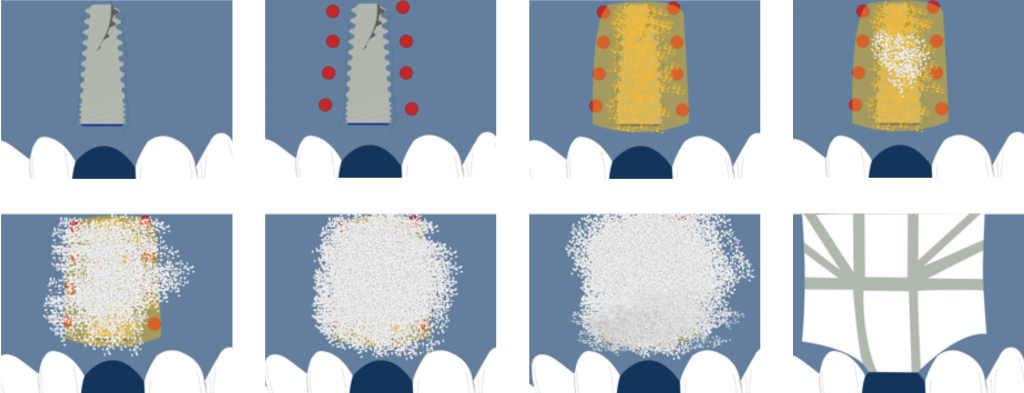
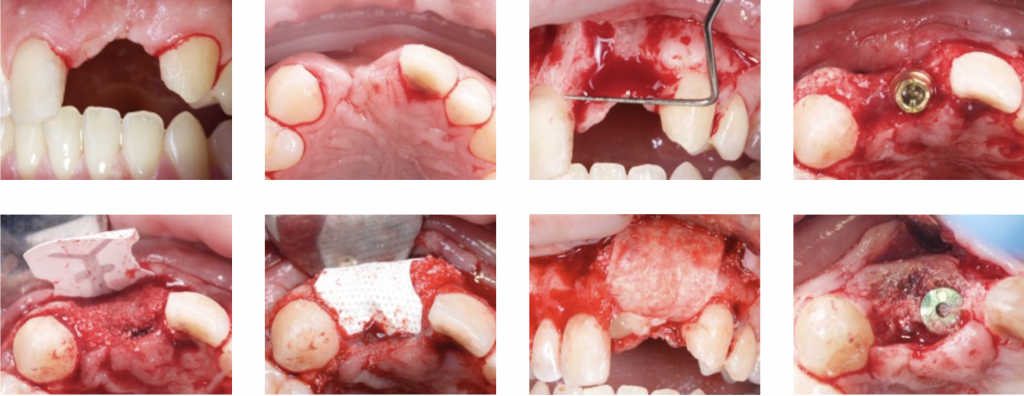
- Sutures should be adapted to allow submerged healing.
- De Stavola showed minimal tension (less than 5g) on the flap margins and did not interfere with
primary wound closure.
More tension means more risk and significant complications, so De Stavola proposes a Suspended External-Internal suture (SEI) to reduce marginal flap tension after bone reconstruction (Stavola 2014).
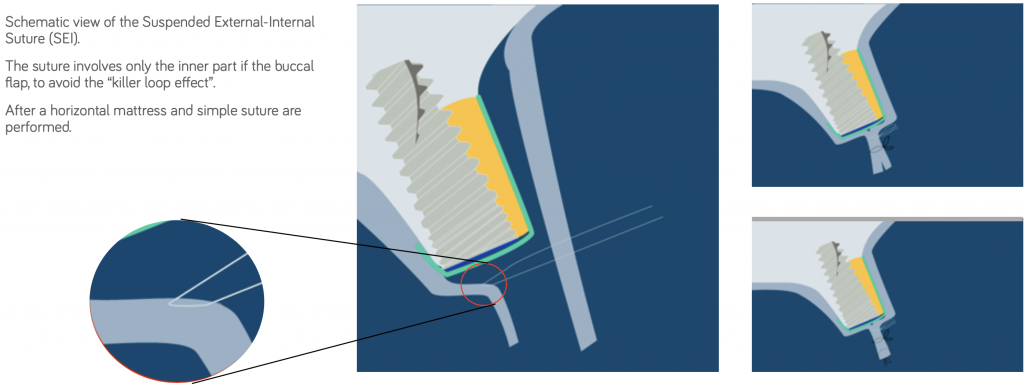
The suture involves only the inner part of the buccal flap to avoid the “killer loop effect.”
After a horizontal mattress and simple suture are performed.
- If we seek a vertical gain, a staged approach is recommended: first regenerate and then place the implants (Artzi 2010).
Conclusion about guided bone regeneration in common defects
Performing these techniques will allow you to solve 90% of the cases where guided bone augmentation is needed. Of course, we can use more complex techniques, but this article was meant to give you some insights about guided bone regeneration that you can start using right away.
Nevertheless, I strongly recommend you read our digital book about guided bone regeneration and take Luca De Stavola classes, which are exceptional and will help you solve the most complex cases.
DOWNLOAD THE FULL SLIDE DECK WITH MORE THAN 100 SLIDES ABOUT GUIDED BONE REGENERATION
Comments
0 totalLoading comments...
Previous
Complications in Dental Implant Dentistry: Buccal Soft Tissue Dehiscences
Next
How to do a Webinar About Dentistry That Your Audience Will Love
Related Articles

Machine Learning for Dentists: Predicting Implant Success with AI
1 min read
Osseointegration: The Stuff That Actually Makes Dental Implants Work (And Why You Should Care)
13 min read
