Two ways to Restore Edentulous Spaces in the Aesthetic Zone

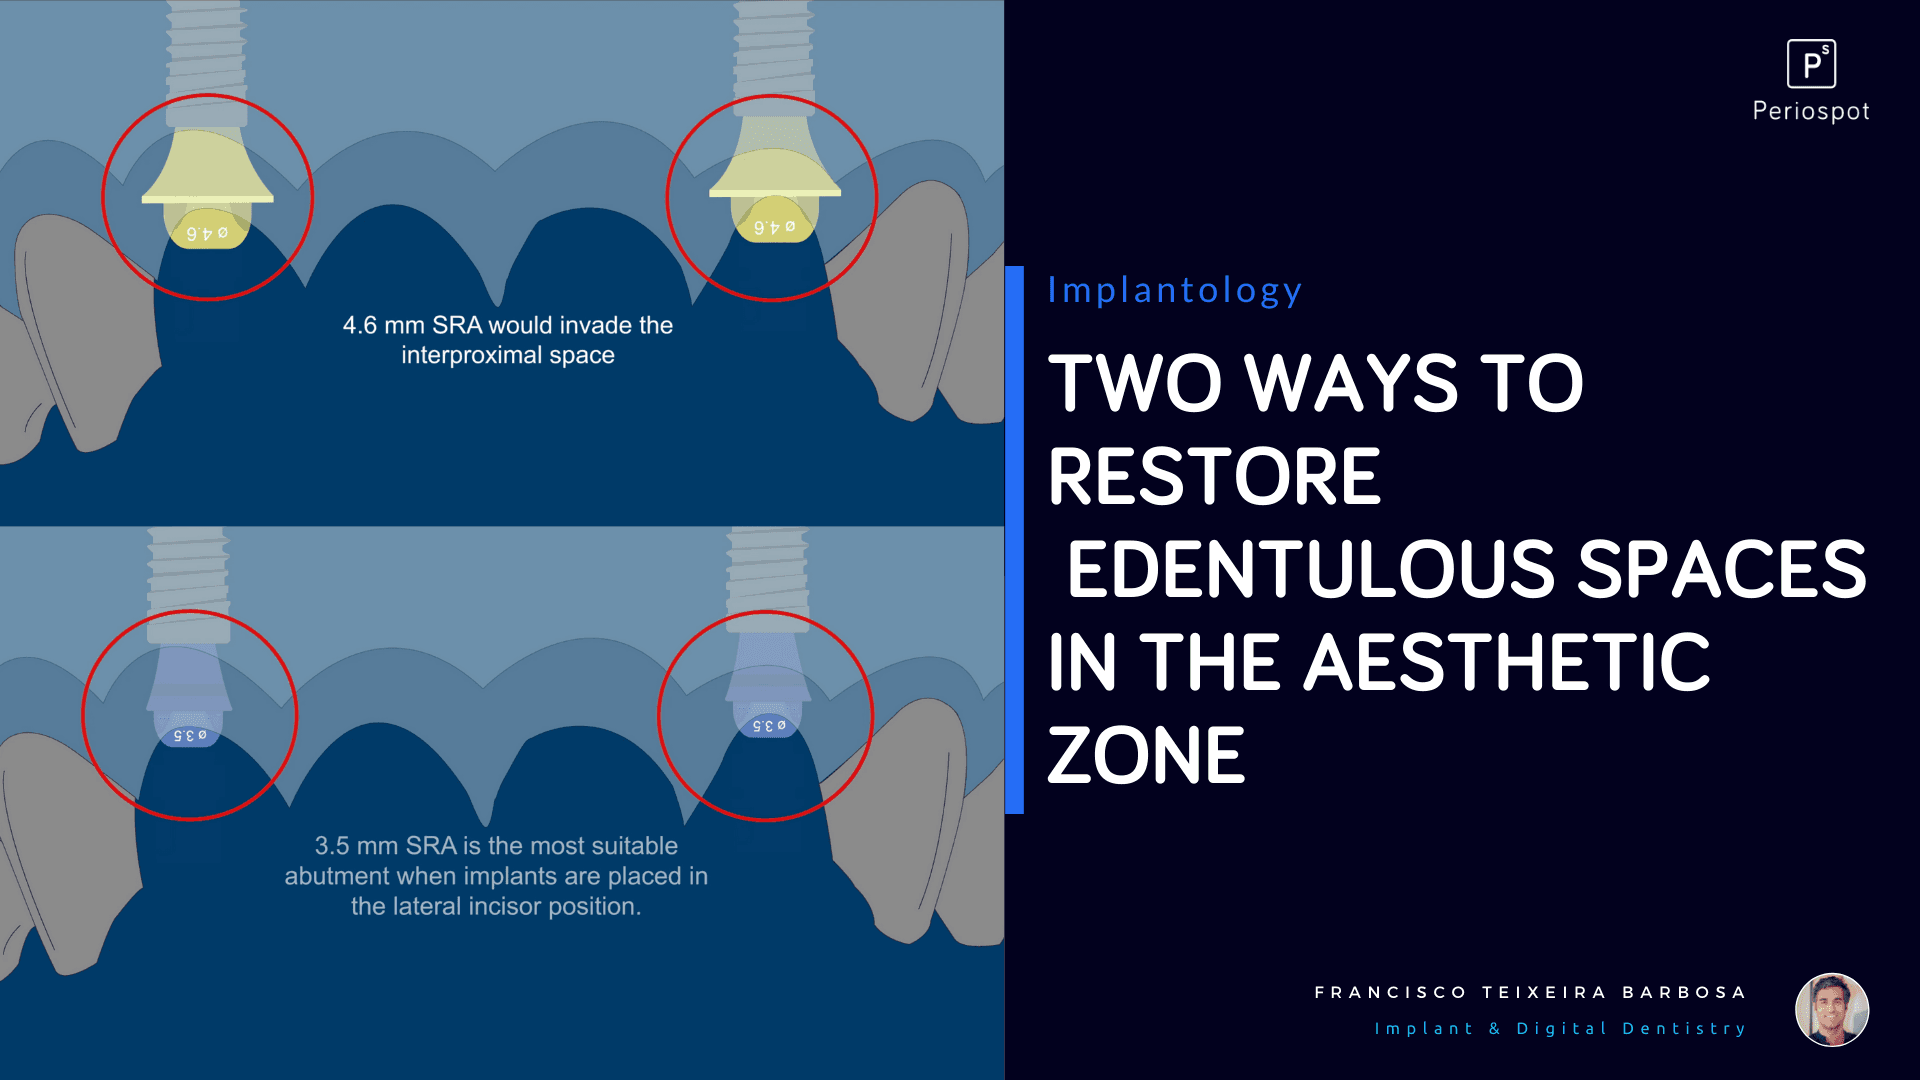
Table of Contents
On the 14th August of 1385, a battle was fought between the Kingdom of Portugal and the Crown of Castile. This battle was named the Aljubarrota Battle, and it was decisive for ruling out the intentions of the Castilian Kingdom to control Portugal.
The Castilians were supported by the French Kingdom and the Kingdom of Aragon, and the Portuguese were supported by the Kingdom of England.
This could have been just another medieval battle between historical kingdoms, but surprisingly, the most unexpected thing happened that day.
The Portuguese and the English were utterly outnumbered, as they only had an army of 6.600 men against the French, Aragon and Castilian army with 31.000 men.

The most obvious and expected outcome of this battle was for the Spanish army to crush the Portuguese men.
But everything went wrong that day for the Spanish pretentions, and the Portuguese army defeated the enemy with just a few casualties, 1000 men, against 10.000 from the Spanish coalition.
How is this story related to implant dentistry?
What sometimes is the most obvious situation in our daily practice is not necessarily the most correct one.
This article is about challenging our intuition and brainstorming around a common situation in our daily practice: where should implants be placed in edentulous space in the aesthetic zone?

Clinical Situations
After the extraction of teeth, several biological events take place that leads to vertical and horizontal volume loss in the alveolar bone (Schropp 2003, Araujo & Lindhe 2005), and this bone loss cannot be avoided by placing implants (Botticelli 2004, Araujo & Lindhe 2006, Blanco 2008).
Furthermore, after the loss of the teeth in the anterior region between the canines, the convex shape of the alveolar bone will be converted into a straight line between the canines (Vela-Nebot 2011).
This situation is also exacerbated by the loss of vertical volume.
Restoring options
To restore an edentulous span in the anterior maxilla, we can decide between two options:
1) Two implants in the lateral incisors
This option, when performed with implants with a regular platform (>4 mm), is problematic due to the bone resorption that occurs after an extraction.
Placing an implant in a proper and biological reasonable position, which means 1,5 mm away from the canine and with 2 mm of buccal bone, the implant connection would invade the zone of the interproximal papilla, and this would lead to a catastrophic aesthetic result.
When placing an implant is important to respect the biological limitations. Buccally there should always be a bone wall of at least 2 mm thickness (Spray 2001).
This issue can be solved using narrow implants, which was suggested by some authors to avoid the invasion of the interproximal area and maintain a proper distance to the adjacent canine, allowing the presence of 2 mm of buccal bone without placing the implant toward the palatal zone (Vailati 2007).
The problem with this implant position from a biomechanical point of view is that during disocclusion, protrusive forces are supported by the central incisors, and narrow implants can show some prosthetic complications:
- Screw loosening,
- Marginal bone resorption.
- Implant fracture.
Nowadays, implant dentistry has evolved, and we can count on some armamentariums in our clinic that we didn't have years ago. In this matter, there was an improvement with titanium-zirconium material (Ti-Zr), with superior mechanical resistance, compared to pure titanium alloys (Badran 2017).
2) Two implants in the central incisors
For some biological reasons, the amount of bone in the zone of the central incisors will be more preserved than in the lateral incisors.
This means the allowance of placing wider implants, if needed, although, as mentioned before, we can use narrow implants (Ti-Zr, Roxolid®, Straumann®) in case there is not enough bone available, and if for any clinical reason a guided bone augmentation is not an option.
To consider this option, implants with platform switching concepts are the best option in this situation (Ciurana 2009).
It was described that implants should have a distance of at least 3 mm to avoid the loss of the interproximal bone peak (Tarnow 2000).
This study was already analyzed in Periospot in this article about 5 scientific articles we should read with caution.
Although the results of this study showed that the mean height of the papilla between two implants could range from 2-4 mm (3.4 mm average), it is uncertain if this height would be the same if platform switching implants were used.
Less bone resorption is expected around implants with the platform switching concept than in implants with the regular connection.
In both vertical and horizontal components, it allows positioning the implants closer than 3 mm (Ciurana 2009).
From a biomechanics point of view, placing the implants in the central position also has some advantages:
- The forces during chewing and protrusive are mainly applied in the central incisors.
- Lateral forces are applied in the canines, leaving the lateral incisors out of occlusion.
Contraindications in placing two implants in the central incisors
The presence of the nasopalatal canal nerve was reported by Vela-Nebot (2011), as an anatomical limitation that would complicate the placement of the implants in that zone.
Several articles report the placement of implants near or even inside the nasopalatal canal without any considerable discomfort for the patient, except some numbness in the palatal zone that disappears with time (Peñarrocha 2009).
Extra Bonus- Option C
There is always room to consider a third option if there is any particular bone limitation in the central incisor position.
Considering this option is always a good moment to remember the expected height of the papilla between the different anatomic and restorative elements (Salama 1997).
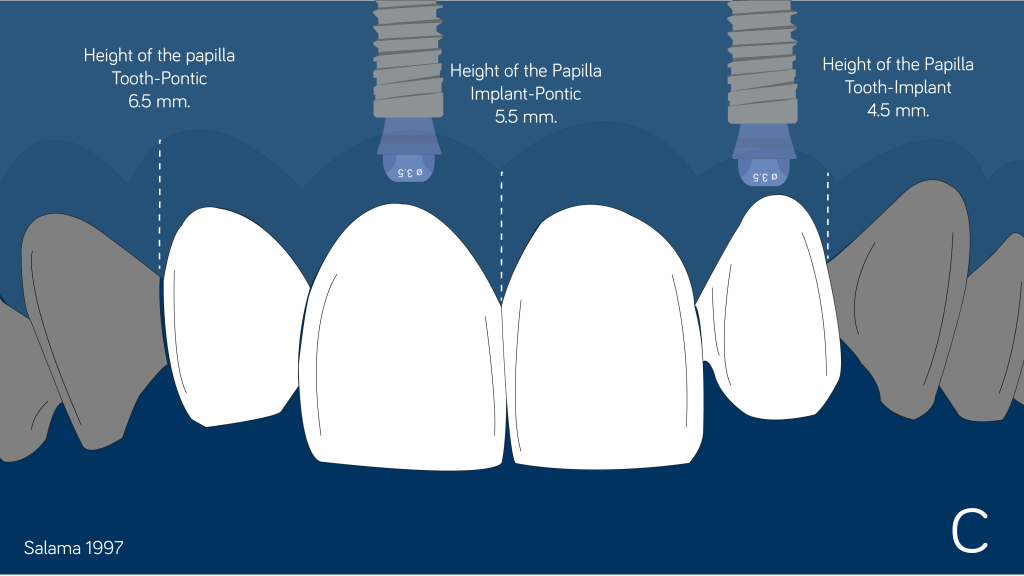
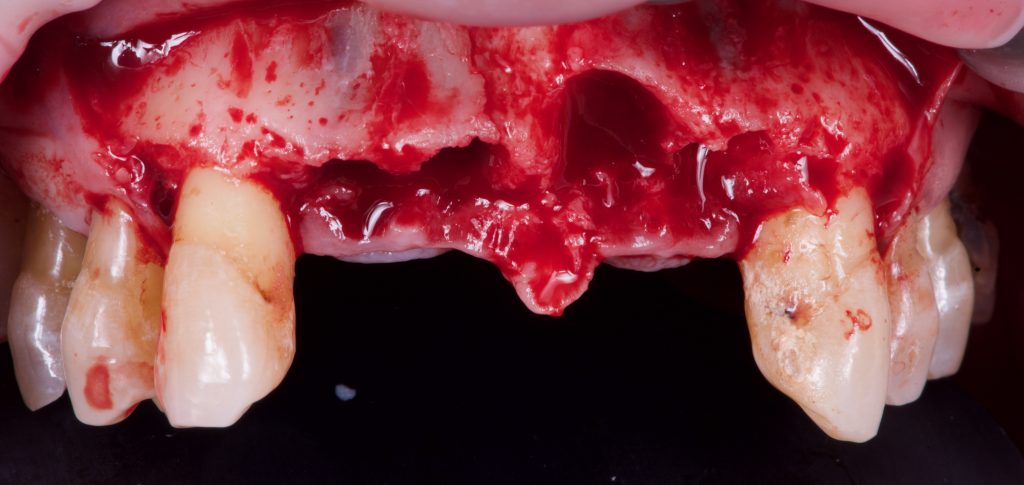
This case would be a suitable candidate for option C due to the bone defect that is present in one of the central incisor.
Essential recommendations
The proper 3D positioning of the implant is paramount to achieving a predictable aesthetic result.
To achieve the ideal position for the implants, the use of a surgical splint guide based on the previously accepted planning and wax-up by the clinician and the patient is mandatory.
In this case, guided surgery can be a good option as the guide will be fully supported by the existing teeth, enabling the more accurate positioning of the implants. In addition, if the provisional was manufactured prior to the surgery, less relining will be needed.
Using narrow-diameter abutments (3.5 mm) will help avoid the invasion of the interproximal papilla. This type of abutment would be more useful if the decision to place the implants in the lateral incisor space were made.
In case the implants are placed in the central incisor zone, a standard platform can be used, but keep in mind that, the wider the abutment, the lower the amount of soft tissue that will be involved in the transepithelial zone.
Another way to plan for cases of this kind (where every millimeter matters), guided surgery is an optimal solution. It ensures that the implants are placed in the most favorable position from a prosthetic and a biological point of view.
More accurate implant position when using guided surgery can be found when treating partially edentulous patients (Tahmaseb 2018).
In these cases, I use an intraoral scanner (Trios 3. 3Shape. Denmark) to obtain the surface scan and merge this file (.3oxz or .stl) with the .dcm file from the CBCT.
Codiagnostix® or Implant Studio® both are suitable software to merge the two files and perform planning of the case using two 3D files (.stl+.dcm).
Conclusions
Sometimes, solutions to clinical situations have an obvious answer based on intuition.
These are the results of a poll that I did on Twitter and Instagram:
It was also evident that the Spanish army would crush the Portuguese military because they had an army that was ten times bigger.
The Spanish army didn't know the battlefield. They underestimated the enemy and lacked leadership (Juan of Castile had to run at full speed to save his life, leaving behind not only common soldiers but also many still dismounted noblemen).
On the other hand, the Portuguese knew the battlefield perfectly. They prepared for the battle, they choose a strategic position, and they used the perfect timing to attack.
Against all the odds, that didn't happen.
When it comes to making a clinical decision, we should have a clear picture of the strategy of approach for every single case.
This strategy should involve a comprehensive knowledge of biology, prosthetics and all clinically relevant factors that can make a difference in the outcome.
This is why it is important that when we go to "war," we should have a deep knowledge of the "terrain" (biology), "strategy" (different prosthetic options) and be well equipped with the best armamentarium (materials).
I hope you find this useful, and I would love to hear about other options we can consider in these cases, so please leave a comment.
Recommended Book- Implants in the Esthetic Zone: A Step-by-Step Treatment Strategy- Ueli Grunder
Check Your Knowledge
Comments
0 totalLoading comments...
Previous
Immediate implant placement in molar extractions sockets using a definitive abutment.
Next
How Deep Is Your Implant? Supracrestal, Crestal, and Subcrestal Implant Position Revisited.
Related Articles

Dental KOL Marketing: How Implant and Periodontal Brands Build Their Key Opinion Leader Bench
11 min read
Dental Video Marketing: How Brands Use Clinical Video to Drive KOL Adoption
12 min read