Bone Remodeling After Tooth Extraction: Understanding the Healing Process in Implant Dentistry


Table of Contents
The other day, I watched my kids trying to build the perfect snowman in our backyard. Every time they piled the snow higher, the base would give way, and their frosty friend would topple over. Undeterred, they tried again and again, but the snow had its own agenda. It reminded me of how our alveolar bone behaves after a tooth extraction—no matter how meticulously we plan, nature often has its own blueprint.
Why does this matter to us dentists?
Understanding bone dynamics after an extraction is like cracking the code into a complex puzzle. It’s essential for successful implant dentistry, and today, we’re going to delve into it.
The Snowman Effect: What Happens After Extraction?
Just like my kids’ snowman, the alveolar ridge undergoes significant changes after a tooth is removed. The bone doesn’t just remain static waiting for our intervention; it remodels, resorbs, and reshapes itself in ways we need to anticipate.
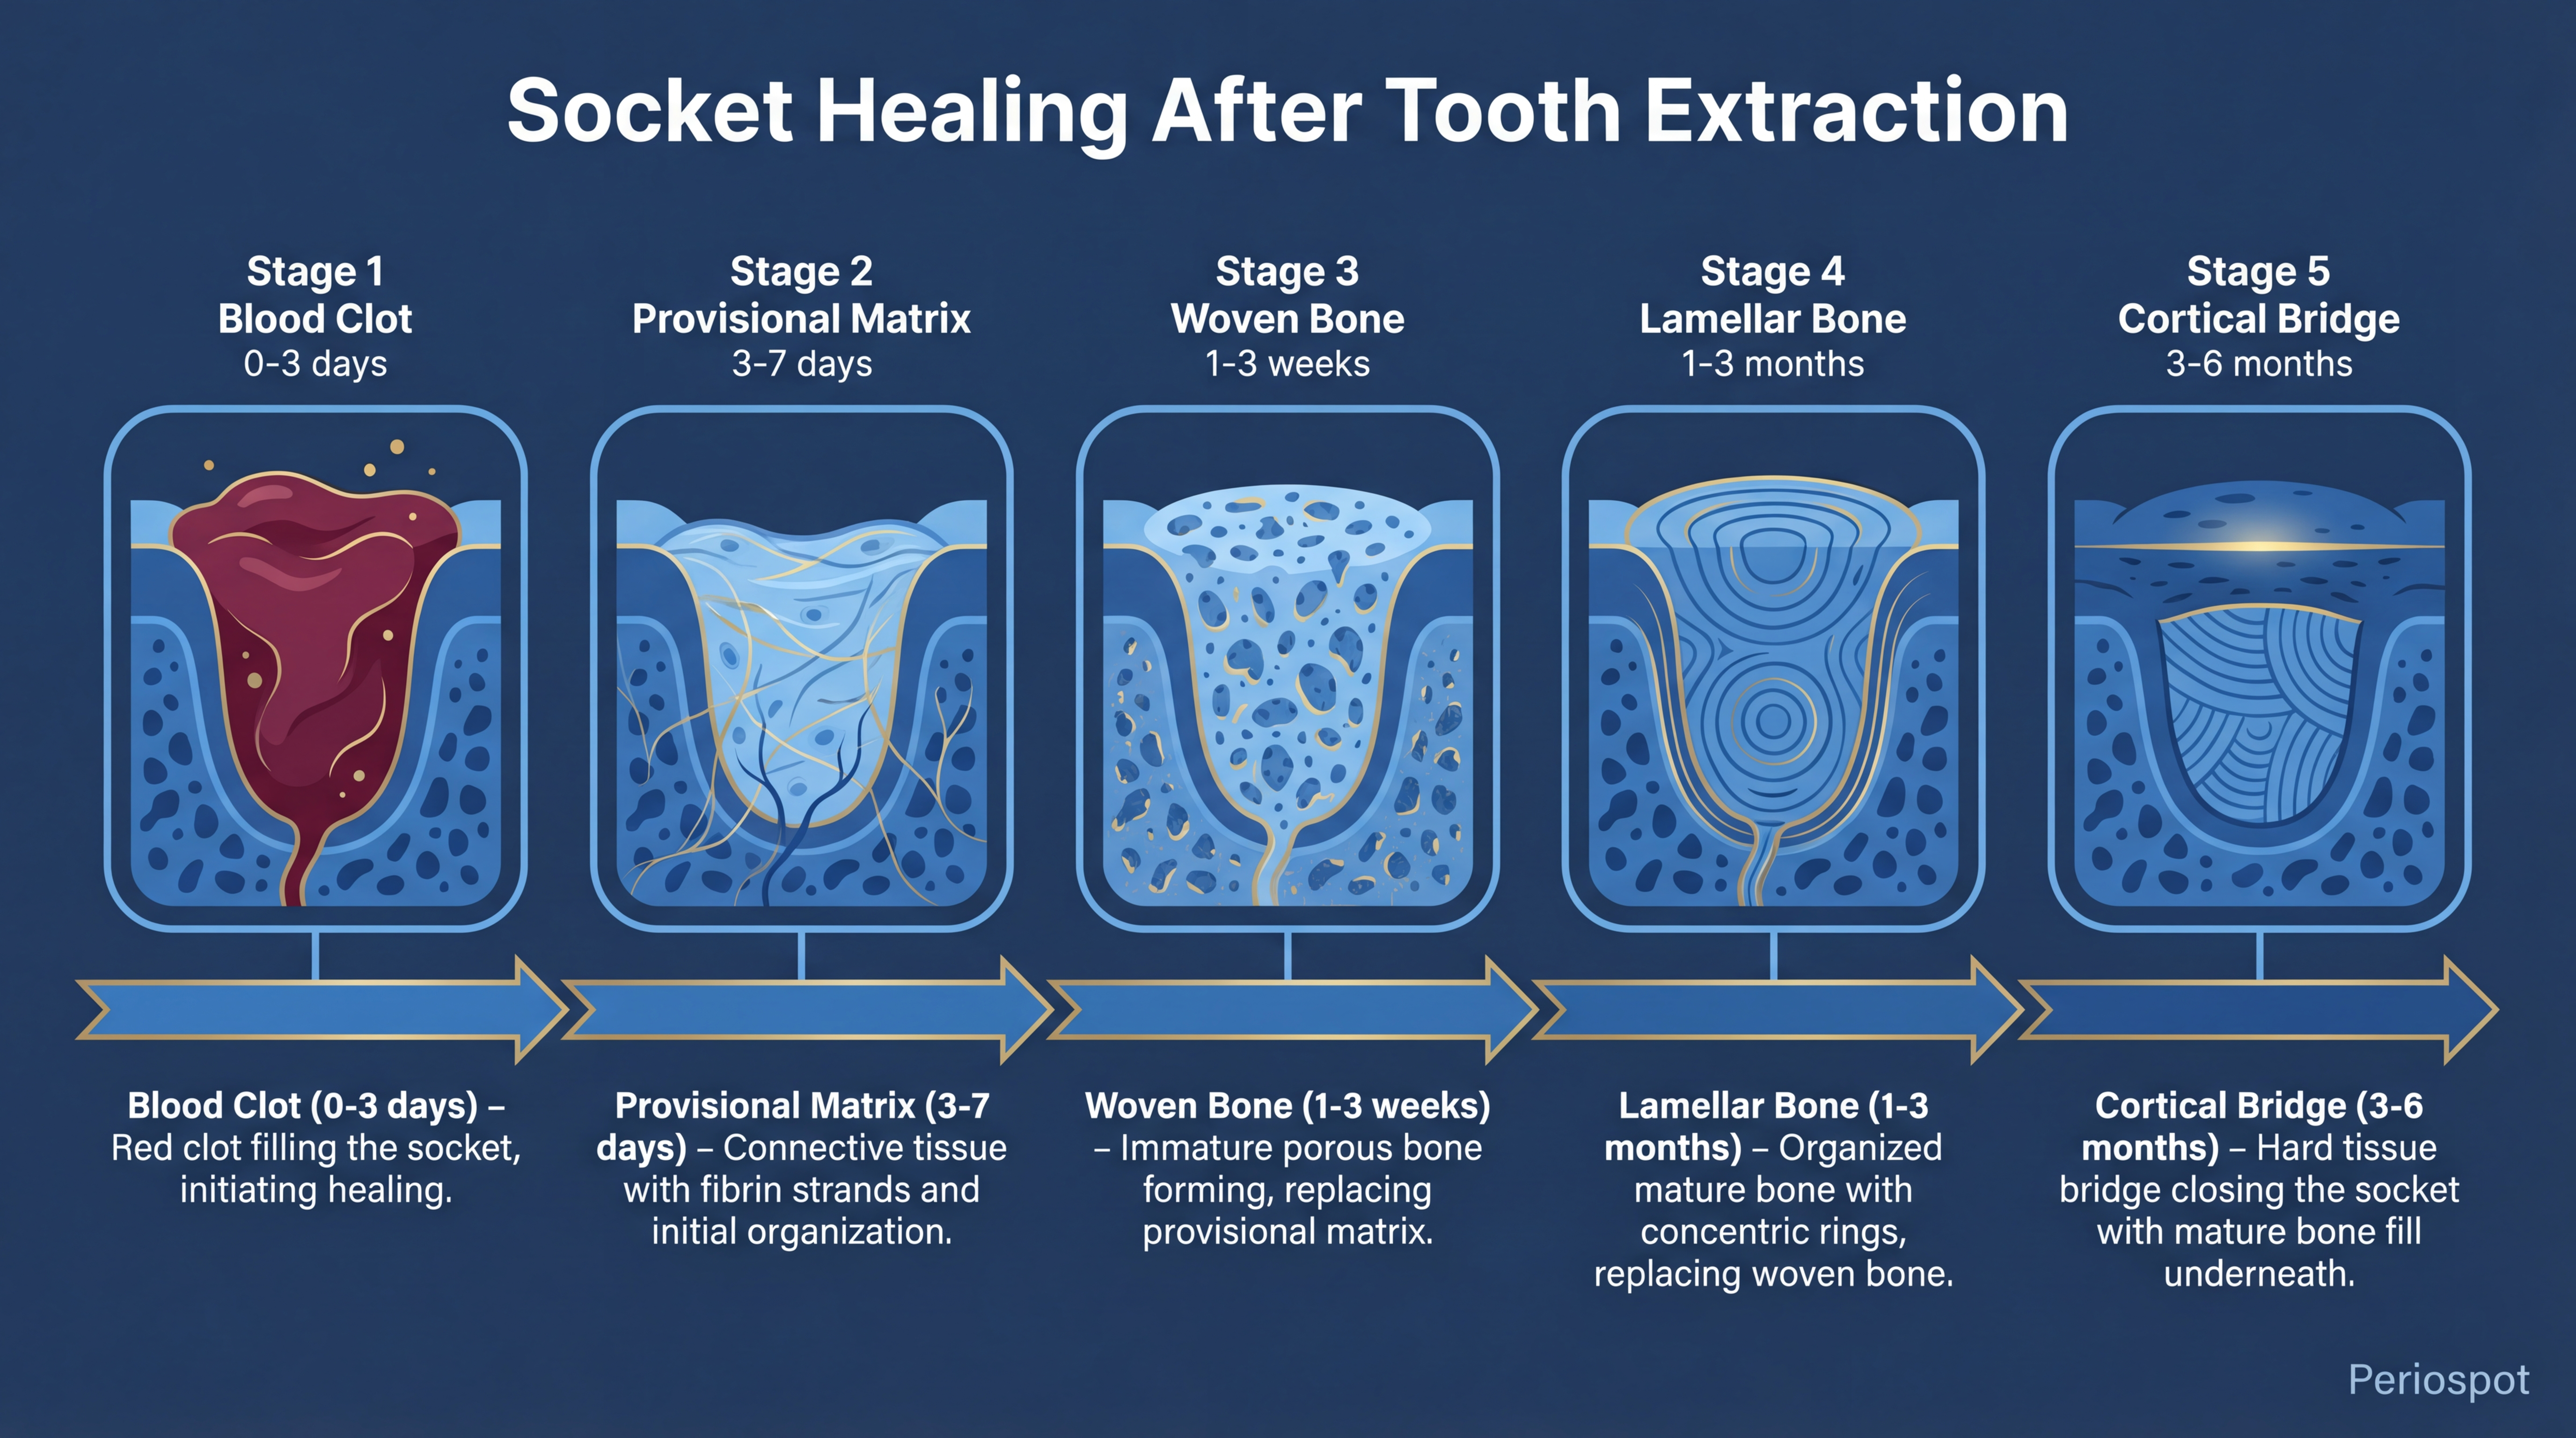
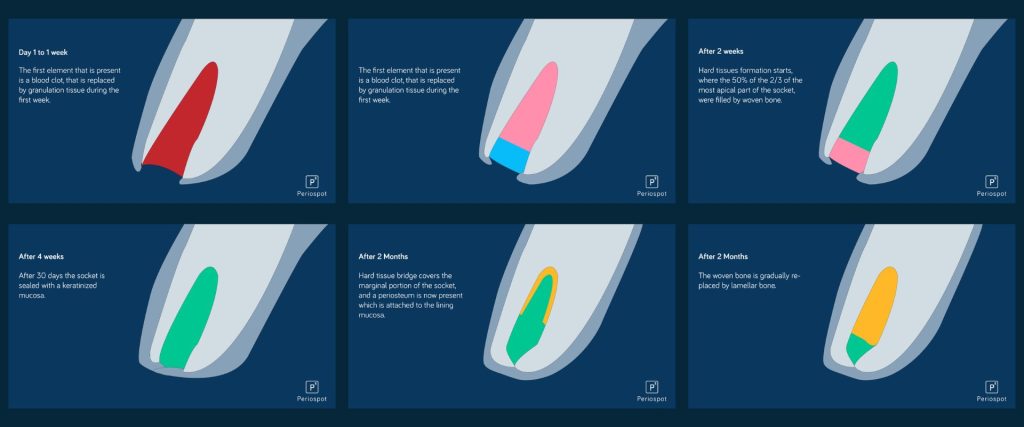
Based on Cardaropoli’s 2003 study, the healing process involves several stages:
- Blood Clot Formation: Immediately after extraction, the socket fills with a blood clot.
- Provisional Matrix Formation: The clot is replaced by a provisional connective tissue matrix.
- Woven Bone Formation: New bone starts to form, but it’s immature and woven.
- Lamellar Bone and Bone Marrow Development: Over time, this woven bone is replaced with stronger lamellar bone and marrow.
- Cortical Bone Bridge Formation: Eventually, a hard tissue bridge forms, closing the socket.
Watch the animation I created explained the full process based on Cardapoli’s article 2003.
The Healing Timeline: Week by Week
Let me walk you through what happens inside that extraction socket over time. Think of it as your snowman going through a complete metamorphosis—from a pile of fresh snow to something structurally different.
Week 1: The Foundation
Within the first 24-48 hours, a blood clot fills the socket. This is your scaffolding—without it, everything falls apart (hello, dry socket). By day 3-4, granulation tissue starts replacing the clot, and inflammatory cells are hard at work cleaning up the site. The soft tissue begins to close over the socket entrance. At this stage, the bundle bone lining the socket wall is already starting to undergo necrosis—it has lost its reason to exist since the periodontal ligament is gone.
Week 2: The Transition
The provisional connective tissue matrix is now well established. You’ll see early angiogenesis—new blood vessels threading through the granulation tissue like tiny roots searching for water. Osteoclasts are actively resorbing the bundle bone from the inner socket walls. The buccal wall, being thinner and composed almost entirely of bundle bone, is already showing signs of vertical reduction.
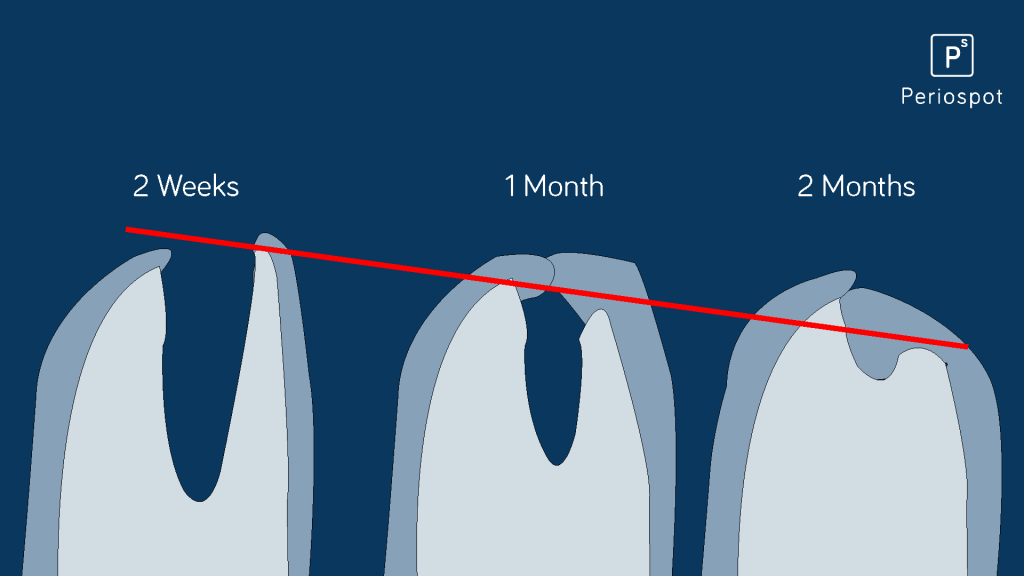
Week 4: Woven Bone Appears
This is where things get interesting. Woven bone starts filling the socket from the apical and lateral walls inward. It’s like watching fresh, loosely packed snow fill a hole—it’s there, but it’s not yet the dense, packable stuff you need for a solid snowman. The socket entrance is typically covered by soft tissue at this point, but underneath, the bone is still immature and highly cellular.
Week 8: The Remodeling Accelerates
By two months, most of the woven bone is being replaced by lamellar bone and marrow spaces. The socket is substantially filled with mineralized tissue, but here’s the catch—the external dimensions of the ridge have already changed significantly. Studies show that most of the horizontal bone loss (up to 50% of the original width) occurs in the first 12 weeks. The buccal plate, especially in the anterior maxilla, takes the biggest hit.
6 Months: The New Normal
At six months, the socket is largely healed with mature lamellar bone, though remodeling continues at a slower pace for up to a year. According to Schropp et al. (2003), the alveolar ridge loses approximately 50% of its bucco-lingual width during the first 12 months, with two-thirds of that loss occurring in the first three months. The vertical loss is typically 1-3mm but can be much more dramatic in thin phenotypes. Understanding how long to wait after extraction is critical for your treatment planning.
The Bone’s Secret Agenda
Here’s the kicker: despite our best efforts, the bone has its own remodeling plans. According to Araújo and Lindhe’s 2005 study, the resorption process happens in two overlapping phases:
- Bundle Bone Resorption: The bundle bone is resorbed and replaced with woven bone. Since the buccal crest is primarily made of bundle bone, this leads to significant vertical reduction, especially on the buccal side.
- External Surface Resorption: Osteoclasts resorb bone from the outer surfaces of both the buccal and lingual walls, leading to horizontal bone loss.
This is fundamental to understand: even if we place an implant immediately, the bundle bone will still resorb. It’s a tooth-dependent tissue—once the tooth goes, the bundle bone follows. It’s like removing the stick from the center of your snowman and expecting the snow around it to stay perfectly shaped. It won’t.
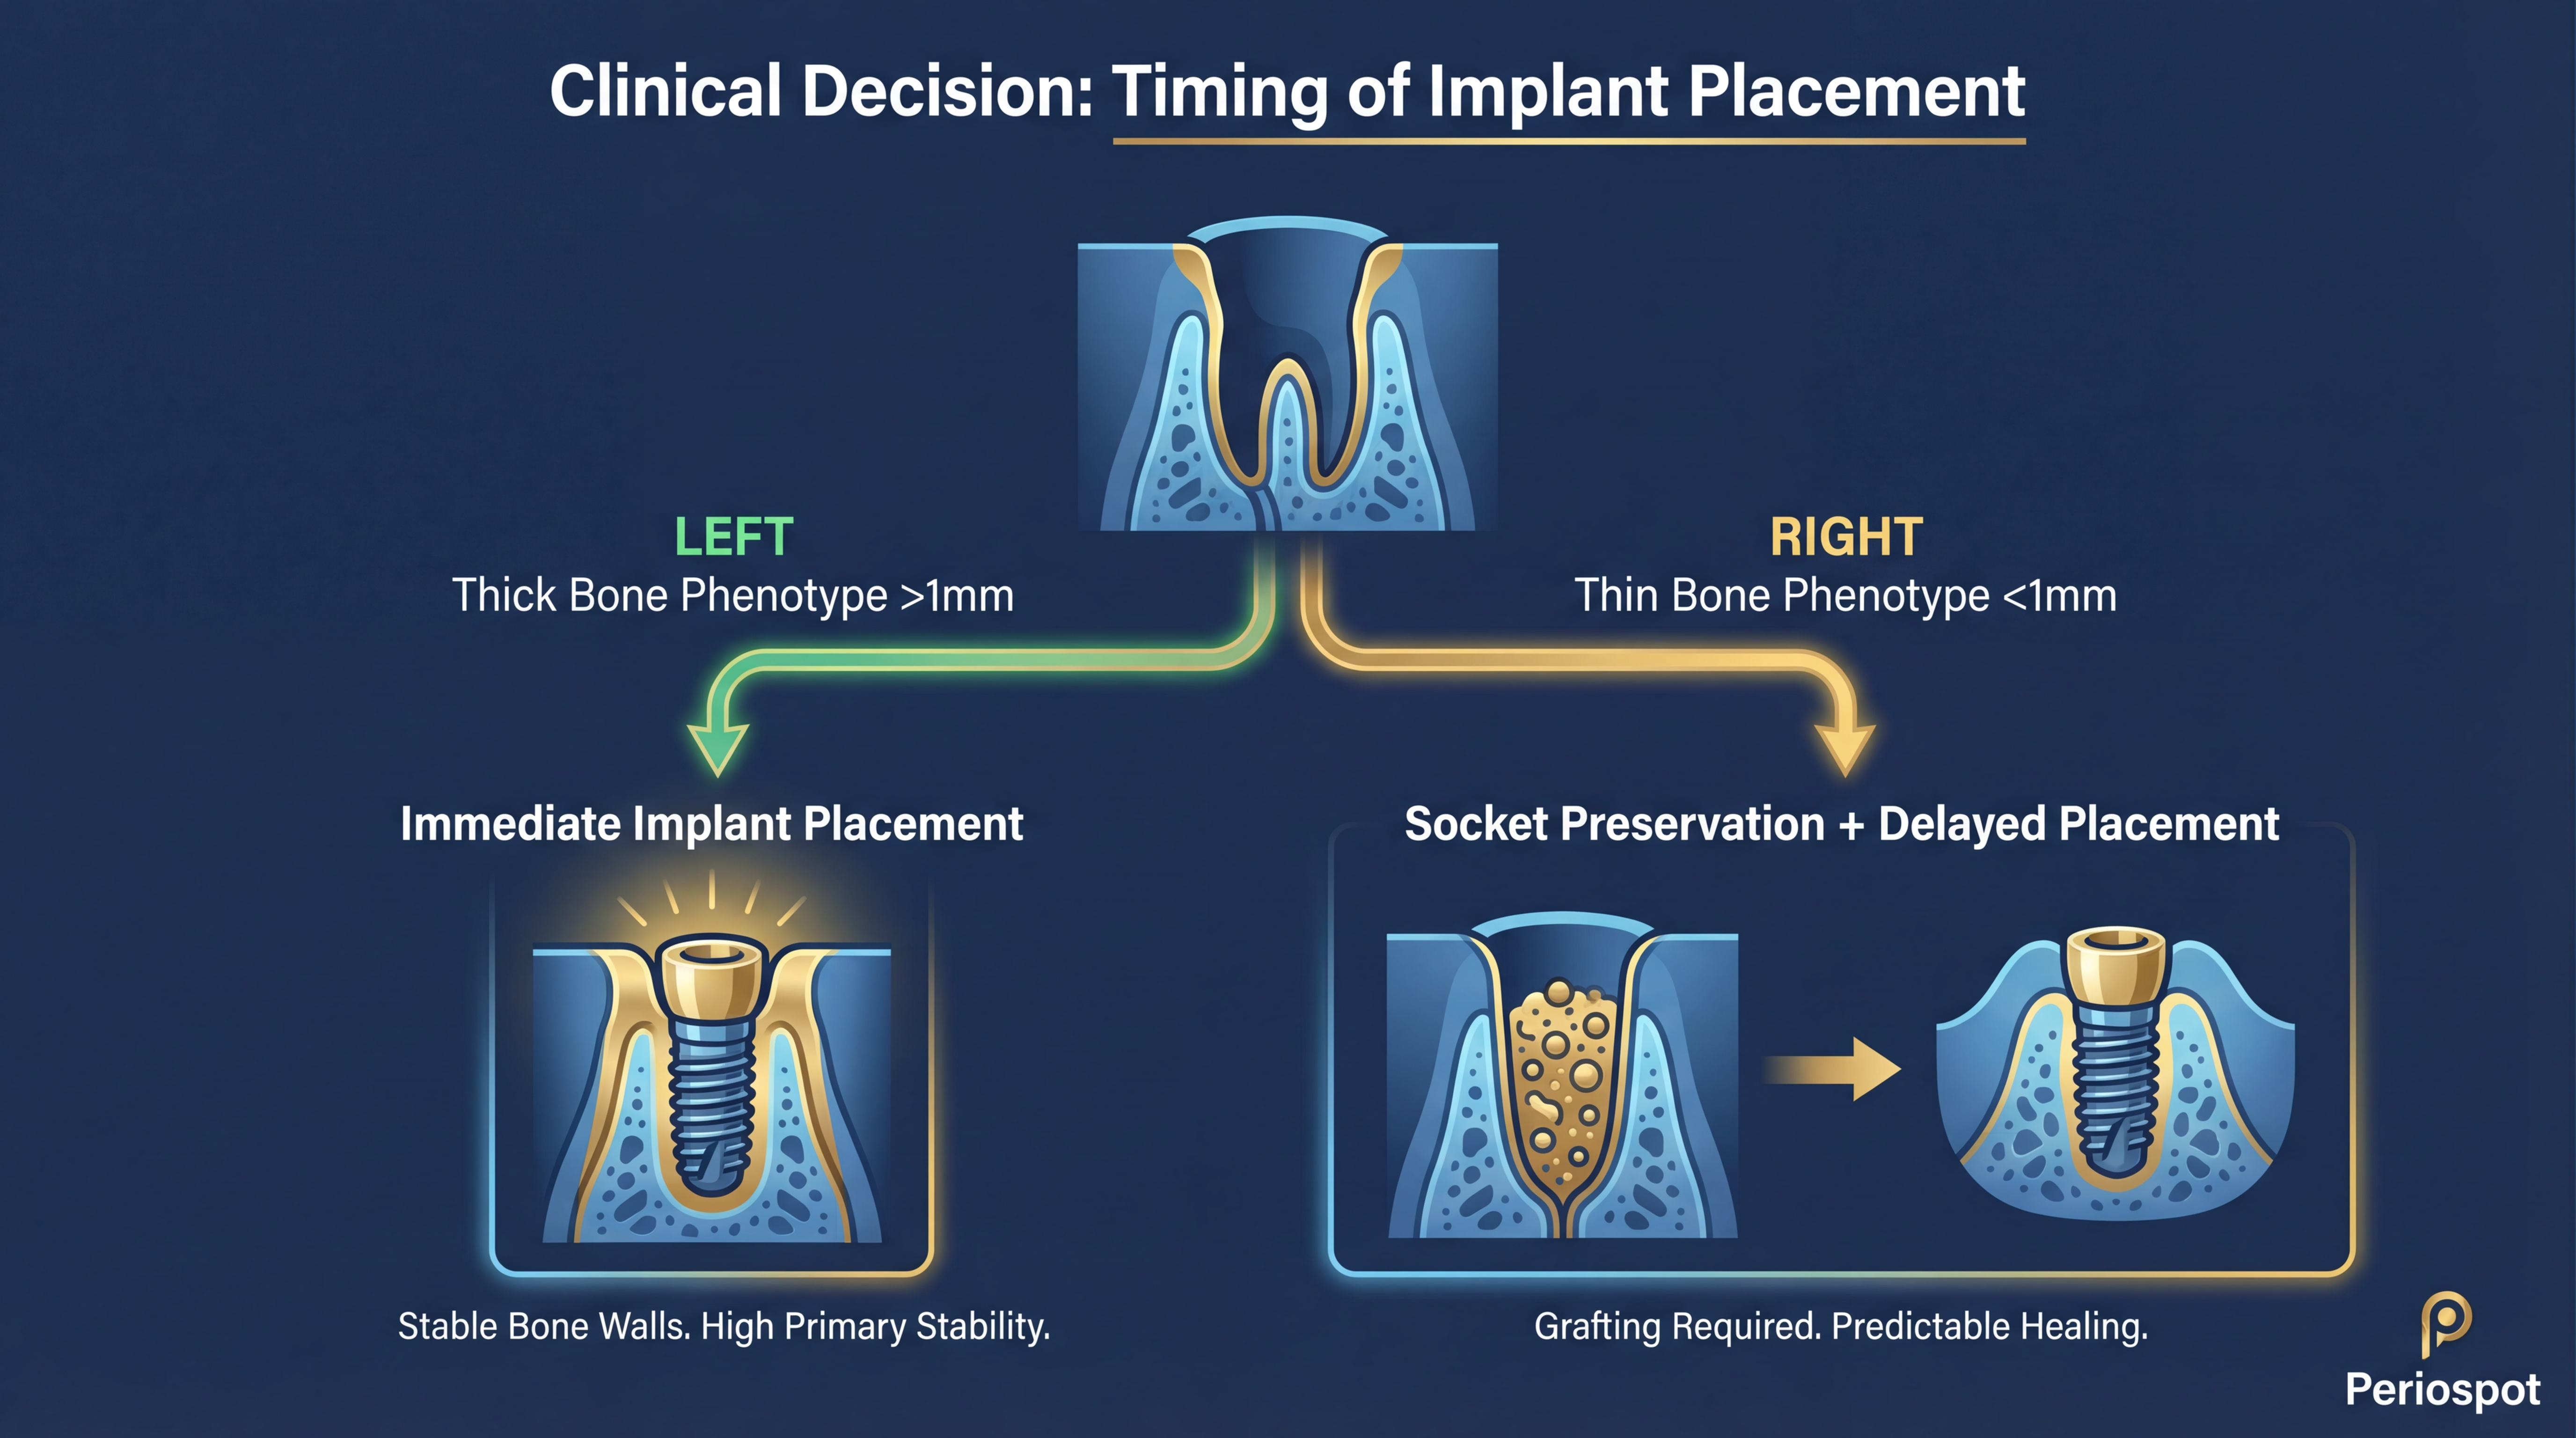
Thin vs Thick Bone Phenotype: Why It Matters
Think of the alveolar bone like a block of snow—the thickness determines how well it holds up. Chappuis et al.’s 2015 study from Bern University was a game-changer because it showed us that not all extraction sites behave the same way. The facial bone wall thickness is the single most important predictor of what will happen after extraction.
Here’s what Chappuis found using CBCT analysis:
- Thin Phenotypes (<1mm): These experience significant vertical bone loss—up to 7.5mm of vertical resorption at the buccal crest. It’s like trying to build a snowman with powdery snow—it just won’t hold together. The study showed that approximately 60% of sites in the anterior maxilla have thin buccal walls (<1mm). That means the majority of aesthetic zone cases are at high risk for significant bone remodeling.
- Thick Phenotypes (>1mm): These fare much better, with minimal resorption—around 1.1mm of vertical loss. Dense, packable snow makes for a sturdy snowman. These sites are your best candidates for immediate implant placement.
The numbers are striking: thin phenotypes lose nearly 7 times more vertical bone than thick phenotypes. That’s the difference between a snowman that stands tall through the night and one that’s a puddle by morning.
Interestingly, in thin phenotypes, there’s a compensatory increase in soft tissue thickness—up to seven times more after a flapless extraction. It’s nature’s way of trying to fill the void left by the resorbed bone. Clinically, this means what you see on the surface may not reflect what’s happening underneath. A CBCT scan before extraction isn’t a luxury—it’s a necessity for proper treatment planning.
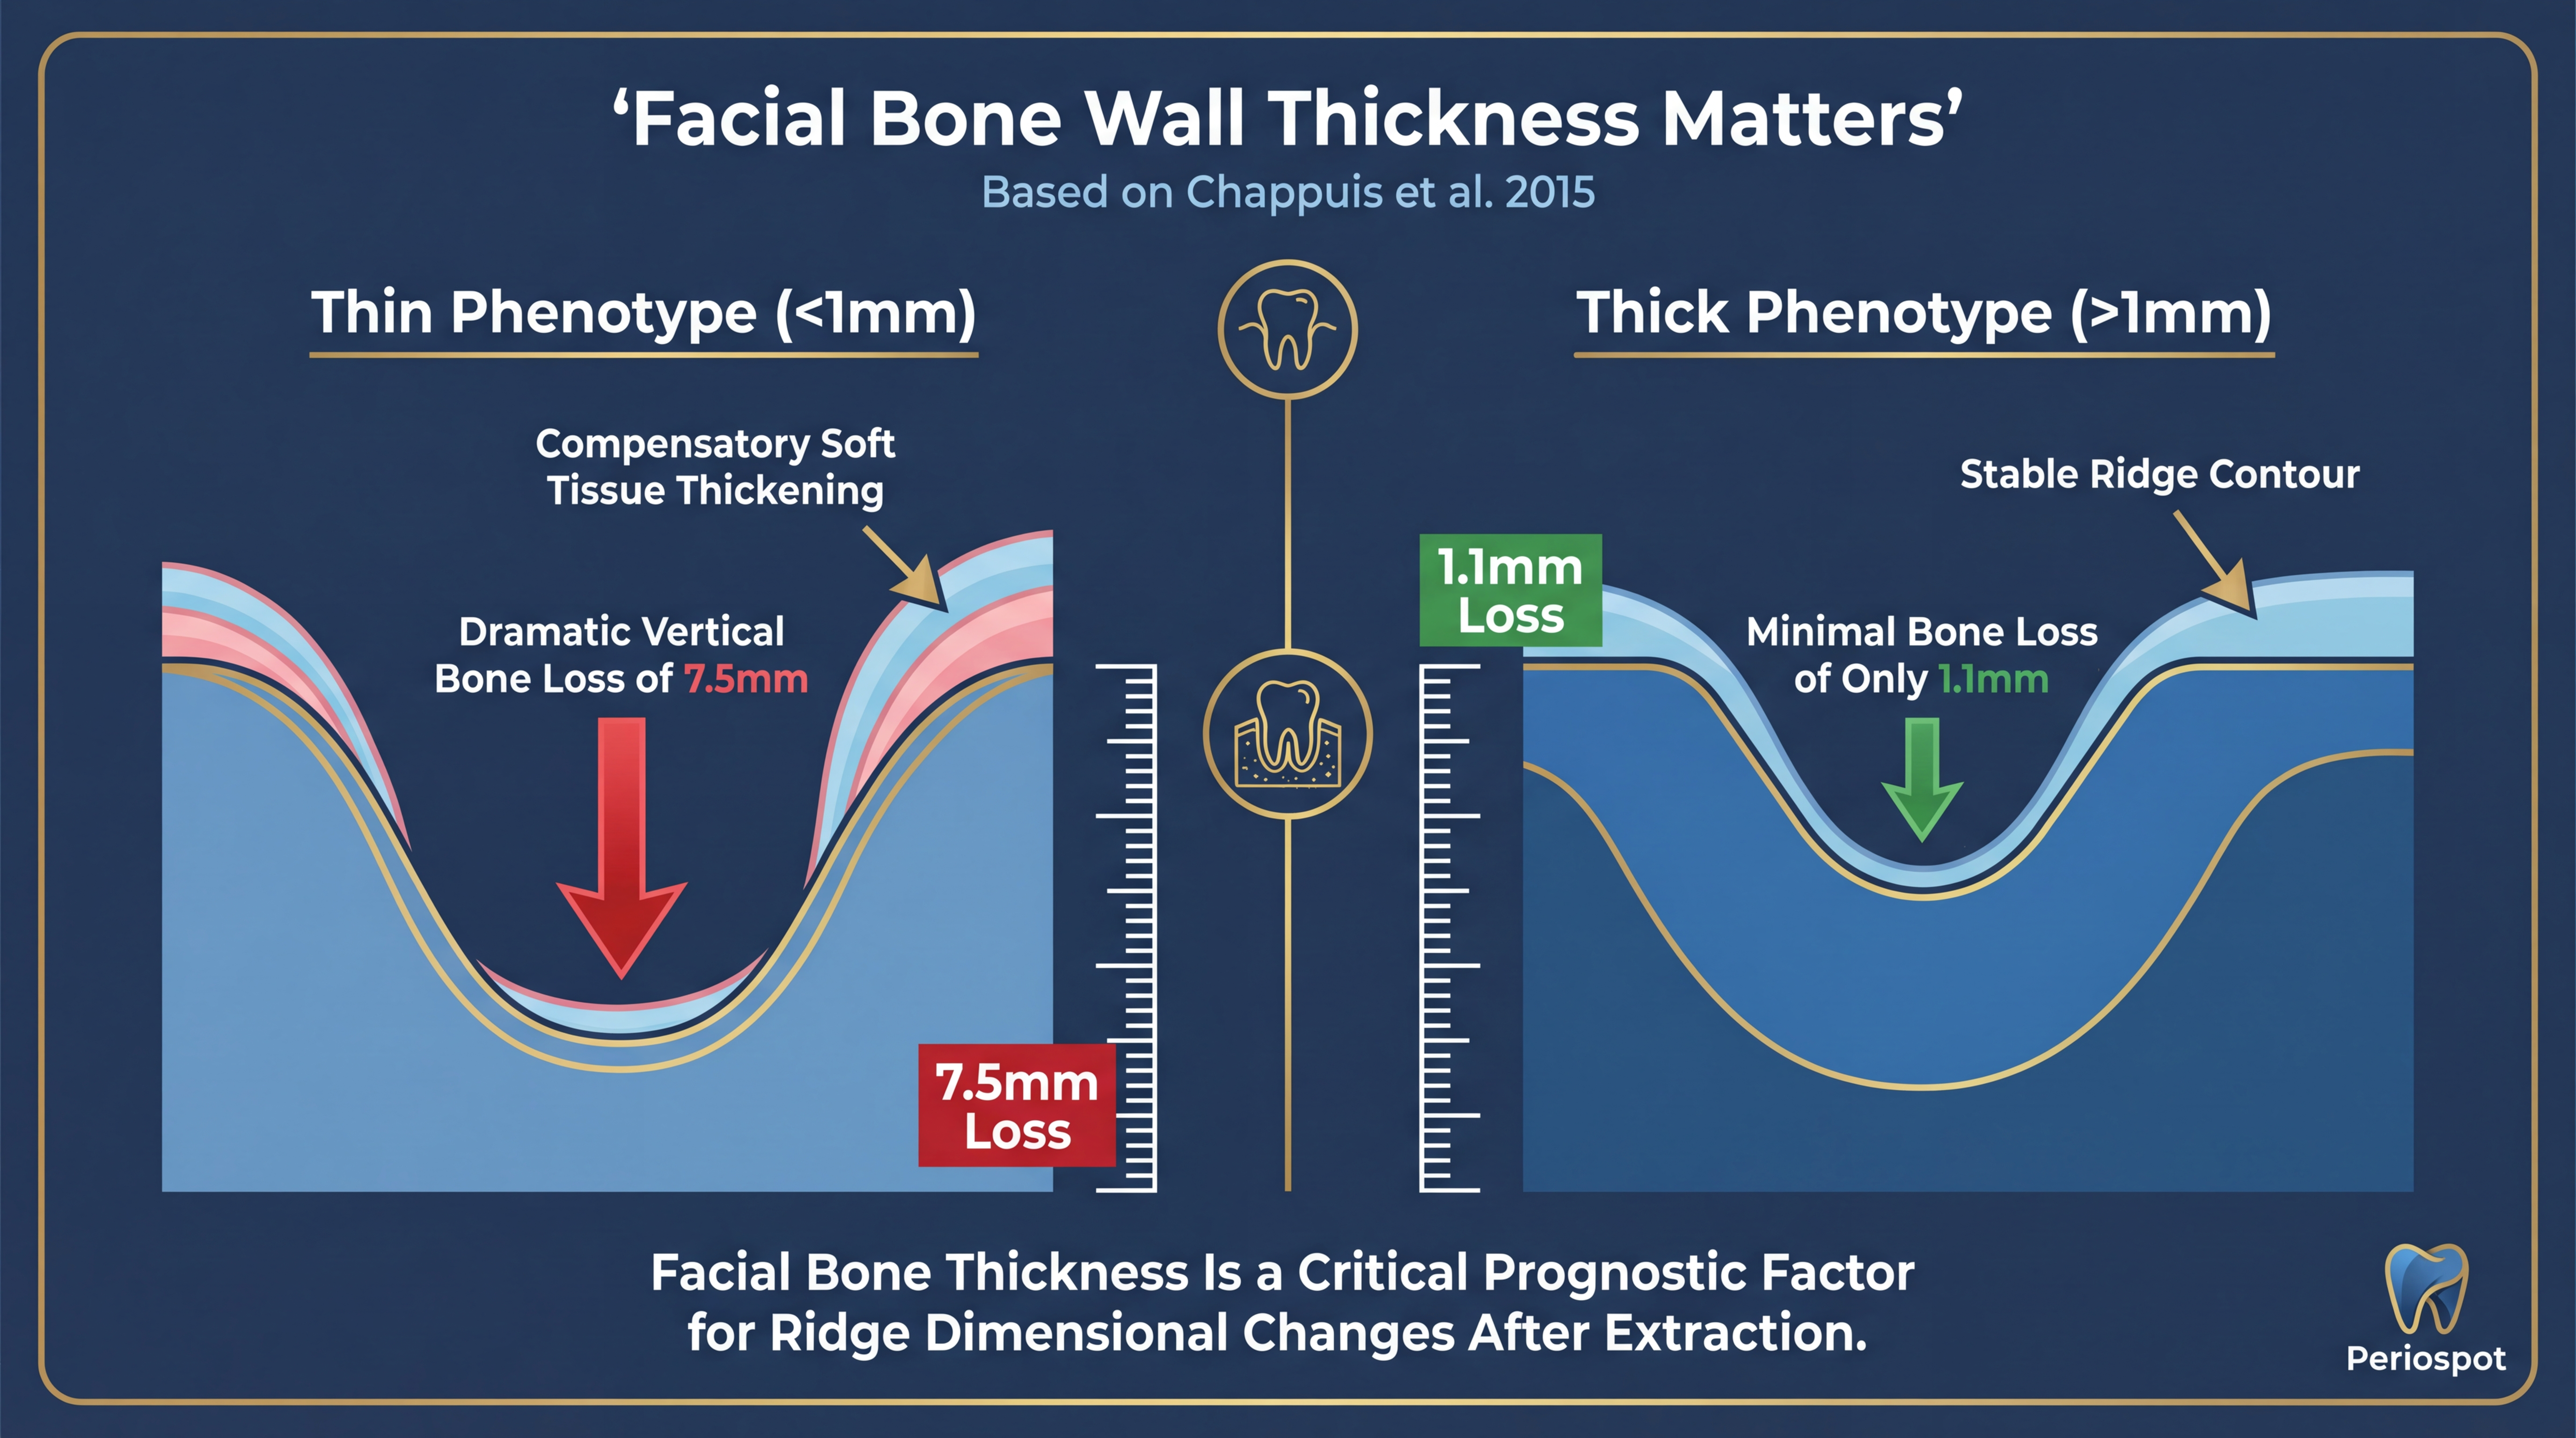
The practical takeaway? Before you extract that tooth, measure the buccal bone wall. If it’s less than 1mm, you need a different game plan than if it’s thick and robust. This single measurement changes everything—from whether you place an implant immediately to whether you need bone augmentation procedures down the road.
Socket Preservation: Can We Fight Nature?
So if bone loss after extraction is inevitable, can we at least slow it down? The answer is yes—partially. Alveolar ridge preservation techniques have become a cornerstone of modern implant dentistry, and for good reason.
The principle is straightforward: fill the socket with a bone graft material and cover it with a membrane or soft tissue graft to prevent soft tissue ingrowth and maintain the ridge dimensions. Think of it as packing extra snow around the base of your snowman and wrapping it in a protective layer to slow the melting.
There are several effective techniques for ridge preservation, including:
- Xenograft particles + collagen membrane: The most commonly studied combination. DBBM (deproteinized bovine bone mineral) with a resorbable collagen membrane has shown consistent results in reducing horizontal and vertical bone loss.
- Allograft materials: Freeze-dried bone allograft (FDBA) or demineralized freeze-dried bone allograft (DFDBA) can be used as socket fillers with predictable outcomes.
- Guided bone regeneration (GBR): Using barrier membranes (resorbable or non-resorbable) to exclude soft tissue cells and allow bone-forming cells to repopulate the defect. For complex cases involving significant bone defects, GBR techniques become essential.
- Socket shield technique: A more recent innovation where a thin buccal portion of the root is intentionally left in place to maintain the bundle bone and periodontal ligament on the buccal side. This is a fascinating approach—you can read more about the socket shield technique and its implications.
But here’s the honest truth: while ridge preservation significantly reduces the amount of bone loss compared to unassisted healing, it doesn’t eliminate it completely. Studies show that preserved sites still lose some width and height—just considerably less. It’s like putting your snowman in the shade: it’ll last longer than the one in direct sunlight, but it will still eventually change shape.
The key benefit of socket preservation is that it keeps enough bone volume to make future implant placement possible without the need for major bone augmentation procedures—saving time, reducing morbidity, and improving predictability.
Immediate vs Delayed Implant Placement
This is the million-dollar question every implant dentist faces: do I place the implant right away, or do I wait? The answer, as you might have guessed by now, depends heavily on the bone phenotype.
When Immediate Placement Makes Sense
For sites with thick buccal bone walls (>1mm), immediate implant placement can be an excellent option. The thick bone provides enough structural integrity to withstand the remodeling process while supporting the implant. The key advantages include:
- Reduced number of surgical procedures
- Shorter overall treatment time
- Preservation of existing soft tissue architecture
- High patient satisfaction due to fewer appointments
However—and this is critical—immediate placement does NOT prevent bone remodeling. The bundle bone will still resorb regardless. The gap between the implant and the buccal wall should be grafted, and understanding the gap and its management is essential for long-term success.
When Delayed Placement Is Wiser
For thin phenotype sites (<1mm buccal bone), rushing into immediate placement is like building your snowman on thin ice—it might stand for a moment, but the foundation is compromised. In these cases, a staged approach is recommended:
- Extract atraumatically and perform ridge preservation
- Wait 4-6 months for the graft to mature and integrate
- Re-evaluate the site with a new CBCT scan
- Place the implant in a site with adequate bone volume
Yes, it takes longer. But the predictability and long-term stability of the result are significantly better. Sometimes patience is the best clinical tool we have.
Clinical Implications: Navigating the Bone Maze
So, what does this mean for us in practice?
Understanding these dynamics helps us develop a decision tree for each extraction case:
- Step 1: Take a pre-extraction CBCT and measure the buccal bone wall thickness
- Step 2: Classify the site as thin (<1mm) or thick (>1mm) phenotype
- Step 3: For thick phenotypes, consider immediate implant placement with simultaneous grafting of the gap
- Step 4: For thin phenotypes, perform ridge preservation and plan for delayed implant placement
- Step 5: In all cases, manage patient expectations about the biological reality of bone remodeling
Bringing It All Together: The Art and Science of Extraction Sites
Just as my kids needed to understand the type of snow to build a lasting snowman, we need to assess each extraction site individually. There’s no one-size-fits-all solution.
Key Takeaways:
- Assessment Is Crucial: Evaluate the bone phenotype before deciding on the treatment plan.
- Manage Expectations: Understand that some bone loss is inevitable, and plan accordingly.
- Use Evidence-Based Techniques: Rely on scientific studies to guide your approach.
Frequently Asked Questions
How long does it take for bone to heal after tooth extraction?
The initial soft tissue healing occurs within 2-3 weeks, but complete bone healing takes 4-6 months. Woven bone starts forming around week 4, and mature lamellar bone gradually replaces it over the following months. However, the external ridge dimensions change most dramatically in the first 8-12 weeks, with up to 50% of bucco-lingual width lost in the first year (Schropp et al., 2003).
What is bundle bone and why does it matter?
Bundle bone is a specialized layer of alveolar bone that anchors the periodontal ligament fibers (Sharpey’s fibers). It lines the inner wall of the tooth socket and is entirely tooth-dependent—when the tooth is extracted, bundle bone loses its function and is resorbed by the body. Since the buccal wall of the socket is often composed almost entirely of bundle bone, its resorption leads to significant vertical bone loss, especially in the aesthetic zone. Learn more about 12 important facts about bundle bone.
Can socket preservation prevent all bone loss?
No, socket preservation cannot completely prevent bone remodeling after extraction. However, it significantly reduces the amount of horizontal and vertical bone loss compared to unassisted healing. Ridge preservation techniques—using bone grafts and membranes—can maintain enough volume for predictable implant placement without needing major guided bone regeneration later. Think of it as slowing the melting of your snowman, not stopping it entirely.
When should I place an implant after extraction?
The timing depends primarily on the buccal bone wall thickness. For thick phenotypes (>1mm), immediate placement at the time of extraction can be predictable with proper gap grafting. For thin phenotypes (<1mm), it’s generally safer to perform ridge preservation first and wait 4-6 months before placing the implant. Your pre-extraction CBCT is the key diagnostic tool.
What is the difference between thin and thick bone phenotype?
According to Chappuis et al. (2015), the critical threshold is 1mm of buccal bone wall thickness. Thin phenotypes (<1mm) experience up to 7.5mm of vertical bone loss after extraction, while thick phenotypes (>1mm) lose only about 1.1mm vertically. Approximately 60% of anterior maxillary sites have thin buccal walls, making this assessment crucial for treatment planning. Thin phenotypes also show a compensatory increase in soft tissue thickness after extraction.
Does a flapless extraction reduce bone loss?
A flapless, atraumatic extraction technique helps preserve the periosteal blood supply to the buccal bone, which can reduce some of the external resorption. However, it cannot prevent the resorption of bundle bone, which is driven by the loss of the periodontal ligament, not by surgical trauma. The key benefit of flapless extraction is in thin phenotype sites, where it preserves the compensatory soft tissue thickening that helps mask the underlying bone loss.
The Final Word: Embracing the Inevitable
At the end of the day, we can’t control nature, but we can work with it. Understanding bone dynamics after tooth extraction allows us to make informed decisions, improving outcomes for our patients.
The evidence from Cardaropoli (2003), Araújo and Lindhe (2005), and Chappuis et al. (2015) gives us a clear roadmap: assess the bone phenotype, choose the right timing for intervention, and use evidence-based techniques to preserve what nature will inevitably try to remodel.
So next time you’re faced with an extraction, remember my kids and their snowman. Sometimes, despite our best efforts, the base will give way. But with knowledge and skill, we can build something lasting and beautiful in its place.
Comments
0 totalLoading comments...
Previous
Socket Shield ruined men. Few understand this.
Next
Bundle Bone: The Complete Guide to Gap Management & Immediate Implants [2026 Update]
Related Articles

Machine Learning for Dentists: Predicting Implant Success with AI
1 min read
Osseointegration: The Stuff That Actually Makes Dental Implants Work (And Why You Should Care)
13 min read